If you are looking for the documentation of older versions, please check the Archive.
Please be sure to review these:
This is the multi-page printable view of this section. Click here to print.
If you are looking for the documentation of older versions, please check the Archive.
Please be sure to review these:
Installation/Maintenance requires an admin familiar with linux.
16 GB32 GB or more recommended10 GB free storage space for application, database, and containerRecommended OS: Ubuntu 20.04 LTS and Ubuntu 24.04 LTS
We do not support Windows at this moment. If you still want to run it on Windows, here’s a guide.
curl, tar, nano (or alternatives)v27.2.0+ with docker-compose-plugin v2.29.7+➜ docker --version
Docker version 27.3.1, build ce12230
➜ docker compose version
Docker Compose version v2.29.7
You may also try alternatives such as Podman, we do not support it at the moment.
1+ gbps recommendedDuring the installation/upgrade, you need to download the application container images from the container registry.
For this, you might need to allow the (all or some of the) following exceptions to your firewall:
curl, tar, nano installed.Make sure Docker Engine (with docker-compose-plugin) is installed on your system.
See System Requirements for more details.
Go to the directory you want to CDM-Server run from, and execute:
curl -s https://get.apis.de/cdm.sh | bash -s v1.4.0# Older versions: v1.3.0, v1.2.1, v1.2.0, v1.1.1, v1.0.1
# Full list is available in Changelogs page
curl -s https://get.apis.de/cdm.sh | bash -s version_string_here
CDM-Server changelogs are available here.
If you want to do it manually, you can get the docker-compose file from the following link: https://get.apis.de/cdm/latest.tar.gz
#!/bin/bash

# Exit immediately if any command fails
set -e

# Check for --skip-download flag
skip_download=false
if [[ "$1" == "--skip-download" ]]; then
  skip_download=true
  shift # Remove the flag from arguments
fi

# Check if version argument is provided
if [ -z "$1" ]; then
  version="latest"
else
  version="$1"
fi

# URL of the tar.gz file, using the provided version or defaulting to 'latest'
url="https://get.apis.de/cdm/$version.tar.gz"
filename="$version.tar.gz"

if [ "$skip_download" = false ]; then
  # Download the tar.gz file
  curl -O --fail "$url"

  # Check if the download was successful
  if [ $? -ne 0 ]; then
    echo "Download failed. Please check the version and URL."
    exit 1
  fi

  echo "Downloaded $filename"
fi

# Extract the tar.gz file
echo "Extracting $filename (without dummy certs)..."
# Step 1: Extract all files except the PFX files
tar --exclude="cdm-ldaps.pub" --exclude="cdm-server.pfx" --exclude="cdm-server.crt" --exclude="cdm-server.key" -xzvf "$filename"

# Replace :latest with version if needed in docker compose file
services=("db_upgrade" "db" "app" "web" "proxy")
file="docker-compose.yml"
# Remove the 'v' prefix from the version
label="${version#v}"

if [ "$version" != "latest" ]; then
  echo "Updating docker-compose.yml with version $label"
  for service in "${services[@]}"; do
    sed -i "s|/$service:latest|/$service:$label|g" "$file"
  done
fi

# Step 2: Extract the PFX files only if they do not exist

echo "Extracting dummy certs if needed..."
for file in "cdm-ldaps.pub" "cdm-server.pfx" "cdm-server.crt" "cdm-server.key"; do
    if [ ! -f "$file" ]; then
        tar -xzvf "$filename" --wildcards --no-anchored "$file" || true
    fi
done


# Optional: Remove the tar.gz file after extraction
rm "$filename"

# Make the scripts executable
echo "Ensuring scripts are executable..."
chmod +x download
chmod +x start
chmod +x stop
[ -f backup ] && chmod +x backup
[ -f restore ] && chmod +x restore
[ -f pfx_to_pem.sh ] && chmod +x pfx_to_pem.sh

echo "CDM setup for version $version has been downloaded and extracted. Please follow the installation guide here: https://get.apis.de/docs/server/install/"
DotEnv FilesTo use the server, you need to provide some data in the form of two DotEnv files:
.env.env.idpCreate new DotEnv files, copy the contents of the example files, and update the values with your own configuration.
.env FileExample: .env.example
cp .env.example .env && nano .env
.env.idp FileExample: IdP (ID Provider) specific DotEnv files:
.env.idp.azure.example.env.idp.ldaps.example.env.idp.local.examplecp .env.idp.local.example .env.idp && nano .env.idp
cp .env.idp.azure.example .env.idp && nano .env.idp
cp .env.idp.ldaps.example .env.idp && nano .env.idp
Use the following command to login and download the CDM-Server images. You’ll be asked to enter username and password.
sudo ./download
sudo ./start
In case, you need to stop CDM-Server services:
sudo ./stop
Please see Login for more information.
If you want to update your CDM-Server instance to a new version, the steps are quite simple:
Please see this page for database backup instructions.
You should also make a copy of the root directory of the whole current CDM installation folder before upgrading to a newer version. It enables you to roll back to the previous version on upgrade failures.
sudo ./stopYou need to download the new version and (re)start the server.
This is essentially, Step 2, Step 4 and Step 5 of installation process.
So just follow those steps again. In other words:
Please see this page for database restore instructions.
If it didn’t help, delete the whole current CDM installation folder and replace it with your copy which you have made in Step 1 above.
Please set some basic details of the server in the .env file. You can find the .env.example file in the root directory of the project.
.env, .env.idp files etc. are not accessible to unauthorized users.cp .env.example .env && nano .env
## HELP
# https://get.apis.de/docs/server/env/

## ABOUT
# This will be used to create the root business unit
# Do not use special characters
COMPANY_NAME=

## CDM HOST and PORT
# The hostname to access the server.
# Must not contain protocol such as https://
# Must not have port number
# Must not have trailing slash
# Example: cdm.example.com
CDM_HOST=localhost

# Just the port number; 443 recommended
# Default port is 443
CDM_PORT=443

## USE CUSTOM HTTPS CERTIFICATE FOR CDM-SERVER (PRIVATE-KEY)
# If you have a custom certificate (certificate chain and private-key), set this to true.
# You need to place the custom certificate in the same directory as your `docker-compose.yml` file (where you have downloaded CDM-Server).
# The certificate file name must be `cdm-server.crt` and it has to contain the full certificate chain in PEM format.
# The private key file name must be `cdm-server.key` and it has to contain the private key in PEM format.
# For a false value, a self-signed certificate will be created and used for HTTPS.
# Please check [help docs for more information](https://get.apis.de/docs/server/https/).
# Default is false
USE_CUSTOM_CERT=false

## Session inactivity timeout in seconds. Default value is 3600 ~ 1h
# If the CDM-Server does not receive requests for a session for this amount of time, a background process will terminate the session
# Value needs to be at least 1800 ~ 30min and at most 14400 ~ 4h
SESSION_INACTIVITY_TIMEOUT_IN_SECONDS=3600
COMPANY_NAME=APIS Informationtechnologien GmbH
CDM_HOST=cdm.apis.de
CDM_PORT=443
USE_CUSTOM_CERT=true
CUSTOM_CERT_PASS=supersecretpassword
This is the name of your company. It will be used to create the root business unit.
See HTTPS for more information.
After you are done setting up .env, please head over to the IdP Docs to setup .env.idp file.
DotEnv FilesIt is recommended that you do not allow other users in same server system to read the DotEnv files as some of them can contain credentials.
You can try chmod 600 on all of them.
CDM-Server takes the secure-by-design approach and thus enforces HTTPS.
If you set the USE_CUSTOM_CERT environment variable to true:
./cdm-server.crt and ./cdm-server.key where you have downloaded the CDM-Server. Just replace it with your own certificate chain and private key.Make sure the crt file contains the full certificate chain, including the root and intermediate certificates.
The key file should contain the private key in PEM format.
.crt file but a cer file, they are usually the same. You can rename it to cdm-server.crt..key file but a privkey file, they are usually the same. You can rename it to cdm-server.key.PFX anymore.Once you have the renewed certificate file
This will apply the new certificate.
If the variable is set to false, the server will generate and use a self-signed certificate. You can find it in
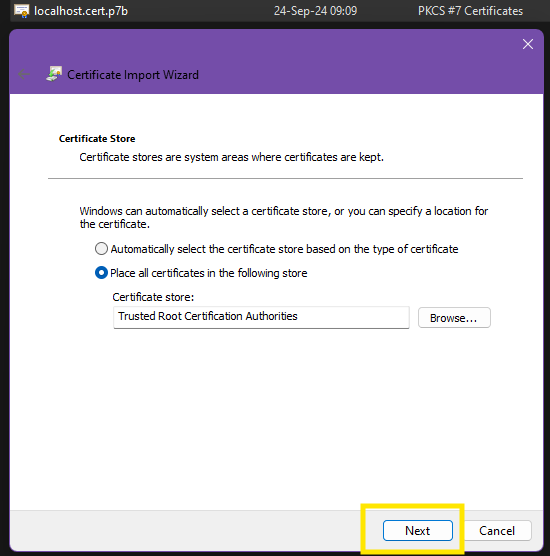
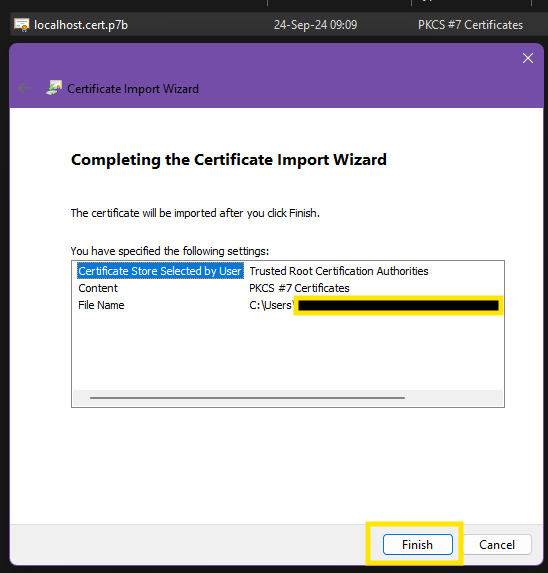
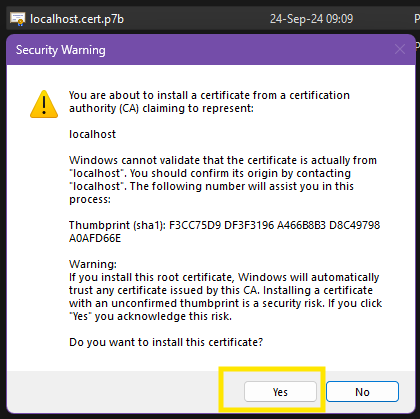
./.data/certs/<CDM_HOST>.cert.p7b - X.509 certificate (contains the public key) that you can import to your Windows OS easily../.data/certs/<CDM_HOST>.crt - Certificate chain in PEM format../.data/certs/<CDM_HOST>.key - Private key in PEM format. You should not share this file with anyone.Please see Install Self-Signed Certificate for more information.
For this, look into LDAP documentation.
DashboardLocal or Ldaps, enter your username and passwordAzure, you will be redirected to Azure login page.This is always https://<CDM_HOST>:<CDM_PORT>/.
For example,
https://cdm.example.com/ (default port 443; no need to specify)https://cdm.example.com:8443/ (if you are using a different port).env.idp file.The CDM-Server supports various ID Providers (IdP) for authentication and user management. You need to choose one according to your organization’s requirements and configure it accordingly.
The CDM-Server supports the following ID Providers:
.env.idp file..env file, please go to the Setting Up .env File page.This IdP is the default IdP for the CDM-Server. It is used to authenticate users against the local user database. It uses an industry standard hashing algorithm to store passwords securely and authenticate users against the stored hash. All passwords require rotation every 180 days and must be at least 8 characters long. The admin can reset passwords for users if needed.
In the .env.idp file, the following variables are used to configure the local IdP:
## HELP
# https://get.apis.de/docs/idproviders/local/

## USER MANAGEMENT
# Available options: local, azure, ldaps
ID_PROVIDER=local

### User Management -> LOCAL
# Only required if ID_PROVIDER=local
# We will create one root admin user using credentials below
# You will need to change password after login

## Root User Login
# Example: admin
ROOT_LOGIN=

## Root User Password
# Must be at least 8 characters long.
# Don't use special characters.
ROOT_PASSWORD=
ROOT_LOGIN and ROOT_PASSWORD values.ID_PROVIDER=local
ROOT_LOGIN=admin
ROOT_PASSWORD=admin1234
CDM Server includes a built-in LDAPS Identity Provider that allows the server to connect securely with your company’s LDAP directory.
This connection uses a connection pool — a single LDAP user account (called the connection account) is used for all LDAP queries from CDM Server.
Note:
All LDAP operations are performed using the permissions of the connection account, not the individual user’s permissions.
CDM Server only needs read access to users and groups under one LDAP main node relevant to CDM workflows.
Before you begin, make sure you have:
cdm-ldaps.pub
Once configured, CDM Server uses LDAPS to:
This means users are automatically assigned to CDM roles that match their LDAP groups.
Tip:
All users who need CDM Server access must belong to the same LDAP group.
This group must be configured as the Login Group when starting CDM Server for the first time.
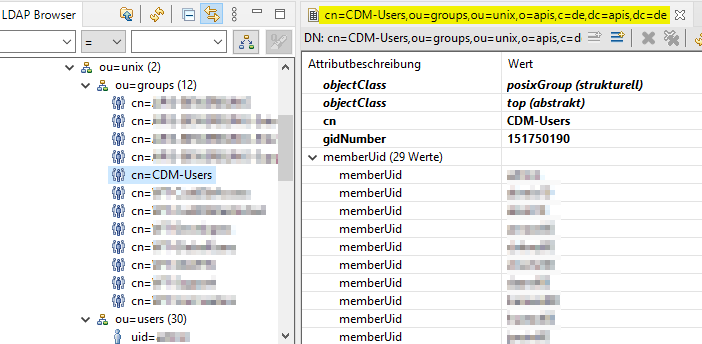
In the image above, the group called CDM-Users includes all users allowed to log in to CDM Server.
Here’s a sample .env.idp file showing how to configure the ldaps identity provider:
## HELP
# https://get.apis.de/docs/idproviders/ldaps/

## User Management
# Available options: local, azure, ldaps
ID_PROVIDER=ldaps

### User Management -> LDAP
# Only required if ID_PROVIDER=ldaps
# LDAPS server host
AUTH_HOST=

## LDAPS server port
# Change it if you are using a different port
AUTH_PORT=636

## The DN of the user to use to query the LDAP server. This user must have read access to the LDAP server.
# Example: uid=admin,ou=users,o=companyname,dc=domainname,dc=country
AUTH_USER=

## Password for that user
AUTH_PASSWORD=

## User Management -> LDAP -> Internal References
# The full DN of the user in LDAP who is considered admin (This account is needed for server setup)
# Example: uid=admin,ou=users,o=companyname,dc=domainname,dc=country
LDAP_ADMIN_DN=

## The base DN for the LDAP group tree
# Example: ou=groups,o=companyname,dc=domainname,dc=country
LDAP_GROUP_TREE_DN=

## The template for the login name. This is used to construct the full DN of the user to authenticate.
# Must contain {loginName} as a placeholder for the login name.
# Example: uid={loginName},ou=users,o=companyname,dc=domainname,dc=country
LDAP_LOGIN_TEMPLATE=

## USE CUSTOM TLS CERTIFICATE FOR LDAPS (PUBLIC-KEY)
# We always use TLS for LDAP.
# If you have a self-signed certificate for your LDAP instance, set this to true.
# You need to place the custom certificate (public key) in the same directory as your `docker-compose.yml` file (where you have downloaded CDM-Server).
# The certificate file name must be `cdm-ldaps.pub` and it must be in PEM format.
# For a false value, we will attempt to validate the LDAP-Server certificate and it will fail for self-signed/expired certificates.
# Default is false
LDAP_CUSTOM_CERT=false
Before you start CDM Server for the first time, define the admin and group settings in your environment (Docker container).
The following parameters must be set:
| Environment Param | Example Value | Description |
|---|---|---|
| ID_PROVIDER | ldaps | LDAP is used as idprovider |
| AUTH_HOST | openldap.companydomain.country | Network address of the ldap service |
| AUTH_PORT | 636 | The port of the ldap TLS connection |
| AUTH_USER | uid=root,ou=users,o=company,dc=domain,dc=country | User dn of the connection pool user account |
| LDAP_ADMIN_DN | uid=admin,ou=users,o=company,dc=domain,dc=country | Distinguished name of the admin user account |
| LDAP_SEARCH_PATH | o=company,dc=domain,dc=country | Search path containing users and groups in its sub tree |
.env.idp and login to the system for the first time, you need to do a mapping. Please follow this guide.This guide provides information and instructions for configuring CDM Server to log in using Microsoft Azure AD as Identity Provider.
To be able to use Microsofts Azure Entra ID as ID Provider in CDM Server you need to make some configurations in Azure. Therefor you need
Local or Ldaps for now, you will have to clear all data and start fresh when you want to switch to Azure.Here is a sample .env.idp file with the azure IdP configured:
## HELP
# https://get.apis.de/docs/idproviders/azure/

## User Management
# Available options: local, azure, ldaps
ID_PROVIDER=azure

## User Management -> AZURE
# Only required if ID_PROVIDER=azure

# The Microsoft Azure AD Directory (Tenant) ID
# The Tenant ID is an UUID and contains hexadecimal numbers (0-9a-f) seperated by - and
# can be found in Azure Portal on the Entra-ID welcome page.
#
# Example: "e53f2a45-f4d2-a11d-223a-77b654c12df5"
AZURE_TENANT_ID=

# The Azure Application (Client) ID
# The Application client ID is an UUID and belongs to the application which is configured
# for the authentication and authorization of azure users for CDM Server. The Id can be
# found in Azure Portal -> App registrations.
#
# Example: "53a12b45-1234-5566-8fe4-93b787a787d6"
AZURE_CLIENT_ID=

# The Azure Application (Client) Name
# The Application client Name is a Text and belongs to the application which is configured
# for the authentication and authorization of azure users for CDM Server. The Name can be
# found in Azure Portal -> App registrations.
#
# Example apis_cdm_authentication
AZURE_CLIENT_NAME=

# The Azure Admin UUID
# The Azure admin UUID must be the id of the Azure user who is going to configure CDM Server at first start.
# The user which belongs to the id is then an admin user and the only user which is able to log in to the
# CDM Server to complete the configuration.
#
# To get your Azure user id log in to https://portal.azure.com/ click on view entra and in the page feed
# in the middle area of the entra welcome page the user id is shown.
#
# Example fd163a2f-112a-7291-bdf4-a4325b78910a
AZURE_ADMIN_UUID=
The CDM Server supports authentication of users on behalf of Microsoft Azure. In Azure an application needs to be configured which provides the authentication flow.
Open azure portal in Web Browser and click on App registrations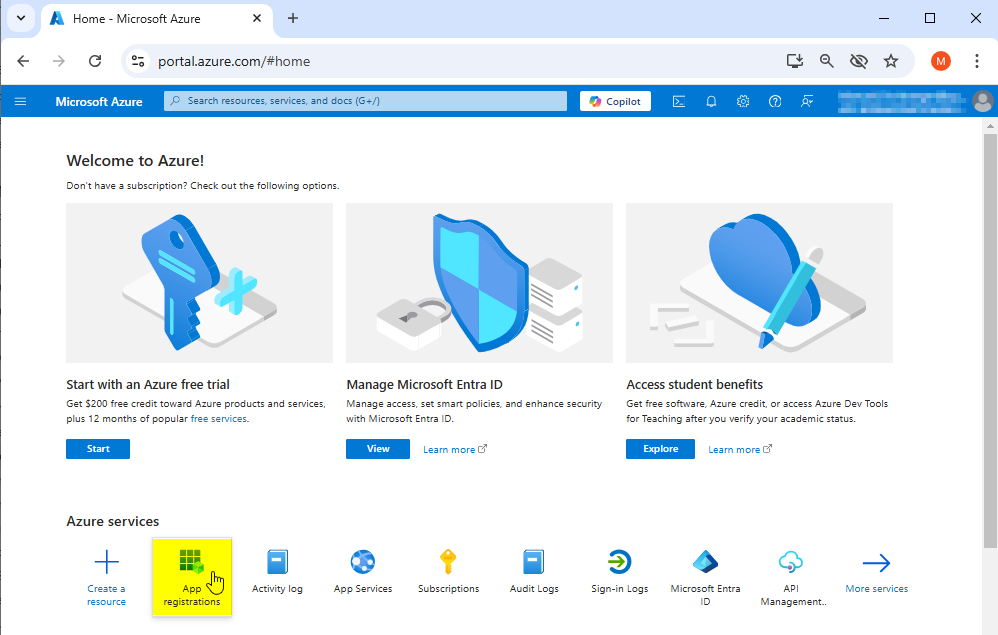
Now the app registrations page shows the registered azure apps.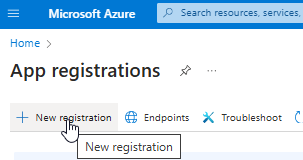
An application registration form is shown
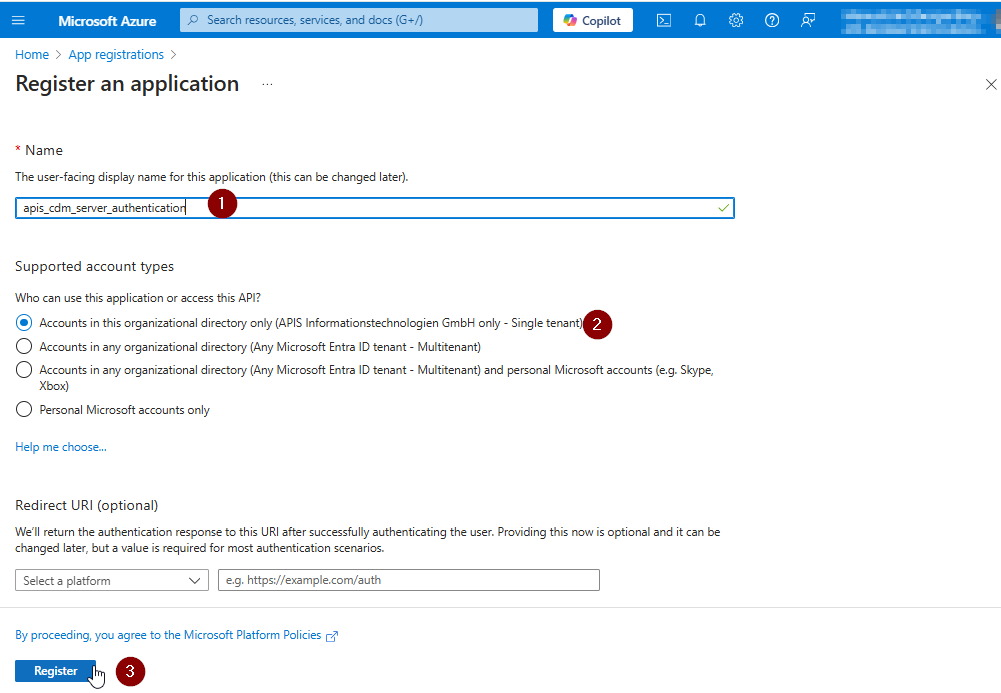
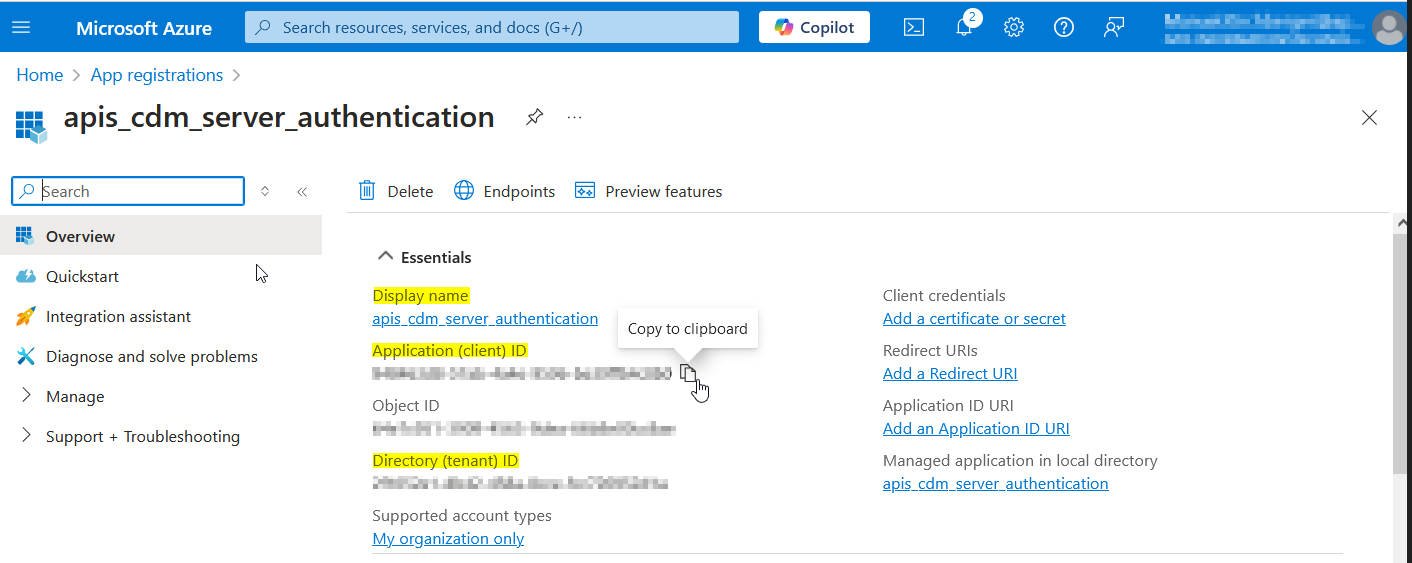
The values of the yellow highlighted fields are necessary for later use in CDM Server configuration. The Ids can be copied moving the mouse pointer to the right end of the value.
Please note the values for the following CDM Parameters for later use:
| CDM Parameter | From |
|---|---|
| AZURE_CLIENT_NAME | Display name |
| AZURE_CLIENT_ID | Application (client) ID |
| AZURE_TENANT_ID | Directory (tenant) ID |
To configure allowed redirect destinations click on Add a Redirect URI on the Application details page.

In the following page click on + Add a platform. As a result a new form opens on the right side where you can select the type of platform.

Choose Single-page application here.

Enter CDM Server redirect URIs for login and logout in the Redirect URIs fields.


For IQ Client an additional configuration is needed, add a second platform

Choose Mobile and Desktop applications here.
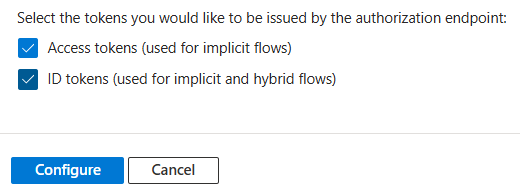
Enter IQ Client redirect URIs for login and logout in the Redirect URIs fields:
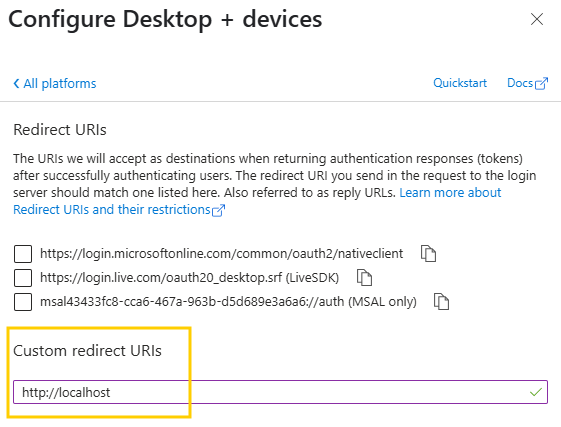
At the bottom of the form enable Access tokens and ID tokens:
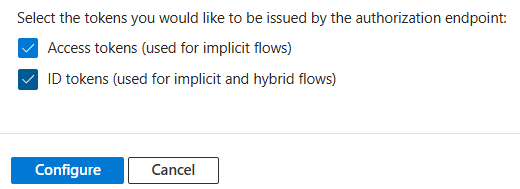
Then click on Configure to finish the configuration.
In the left menu select API permissions.
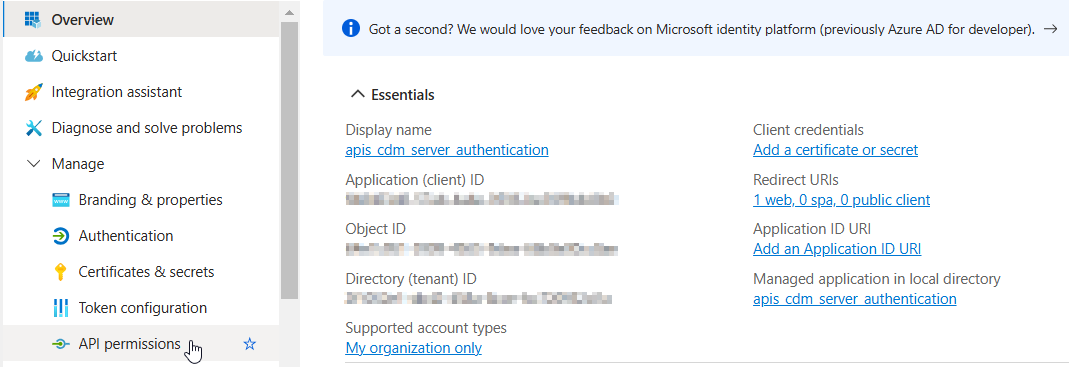
Click + Add a permission.

Select Microsoft Graph and then Delegated permissions. Add the permissions
If prompted, click Grant admin consent for the selected permissions. (This step may require admin privileges.)
The result should look like this:
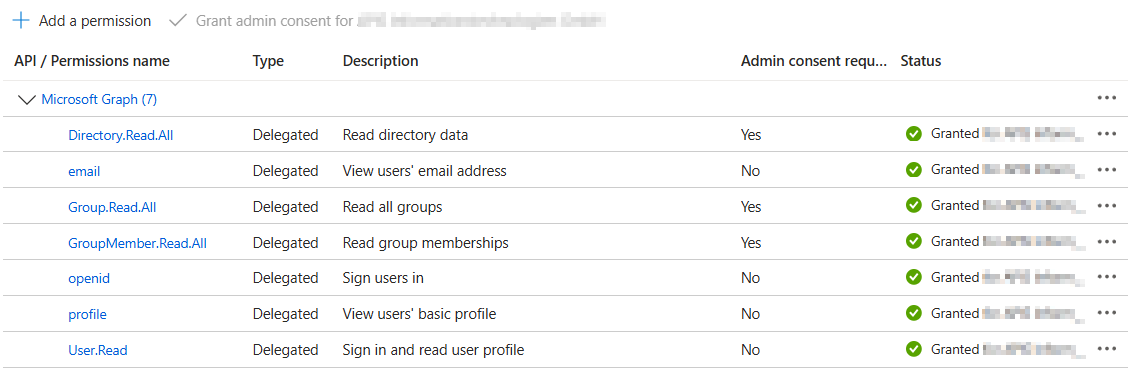
The permissions Directory.Read.All, Group.Read.All and Group.Member.Read.All need Admin consent and are necessary to be able to read members of groups and groups of users which is necessary to provide RBAC flows in CDM Server which are based on group structures in external ID Providers.
To be able to configure the CDM-Server to start and for later use by members of a configured group, you need some values from the Azure Portal.
| # | Name | Description | Usage |
|---|---|---|---|
| 0 | ID_PROVIDER | Fixed value “azure” | Environment |
| 1 | AZURE_TENANT_ID | The Directory (Tenant) ID | Environment |
| 2 | AZURE_ADMIN_UUID | The Admin User’s Object ID | Environment |
| 3 | AZURE_LOGIN_GROUP_UUID | The Login Group’s Object ID | Start Config |
| 4 | AZURE_SCOPE | Fixed value “Read.users” | Environment |
| 5 | AZURE_CLIENT_NAME | Name of the application | Environment |
| 6 | AZURE_CLIENT_ID | ID of the application | Environment |
| 7 | AZURE_CLIENT_SECRET | Secret value of the application | Environment |
The ID_PROVIDER for Azure is fixed and must be set to value azure in the environment.
First we will collect the Azure Tenant-ID, an admin user ID and a login group id.
The Admin user is able to log in to a fresh system to configure the necessary base settings.
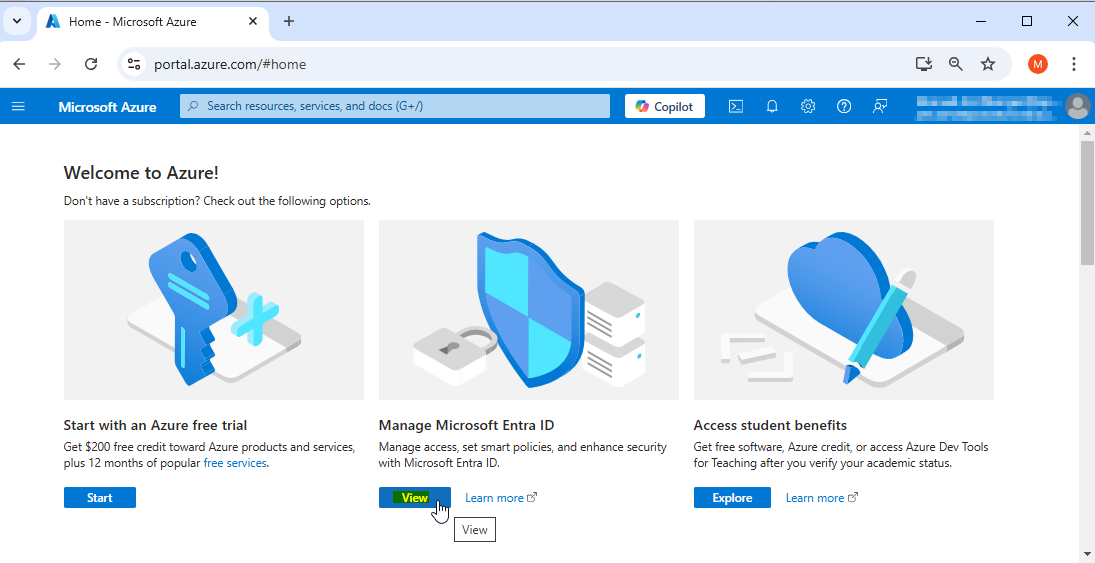
Log in to Azure Portal
On the Welcome Page below Manage Microsoft Entra ID click on View button
You are now on the welcome page of your Tenant:
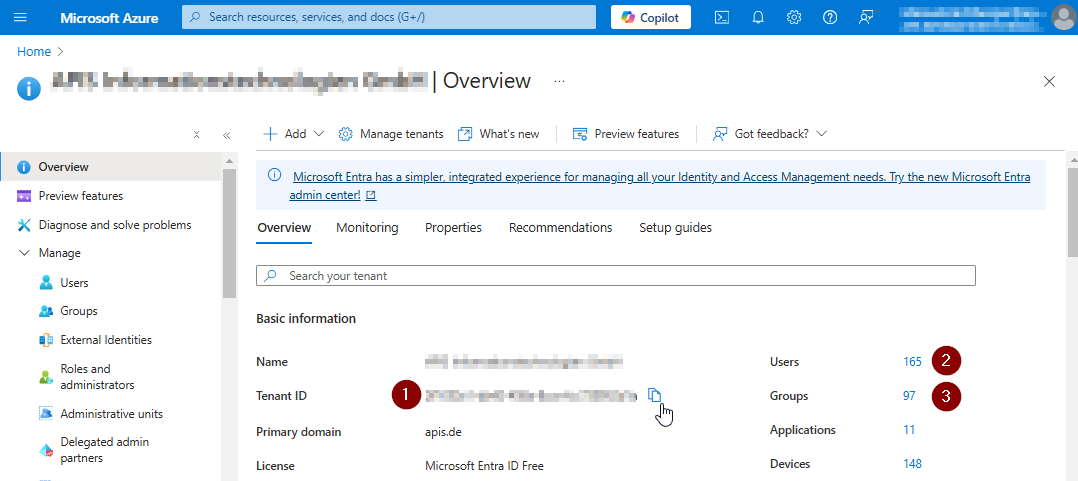
Tenant-ID: You can click on the copy Icon after the value to copy it. Needed for AZURE_TENANT_ID.
Click on the Number link on the right side of Users.
In the appearing User list click on the name of the user, which is going to do the initial system configuration, in the column Display name.
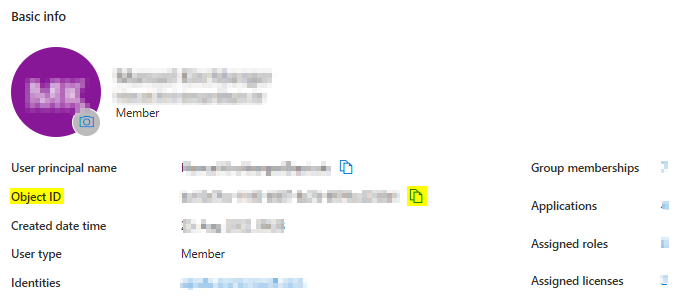 The Object ID value is needed in AZURE_ADMIN_UUID
On the same page you can click on the Number link on the right side of Group memberships. In the appearing list of Groups click on the name of the group which you want to use as login group for all allowed users.
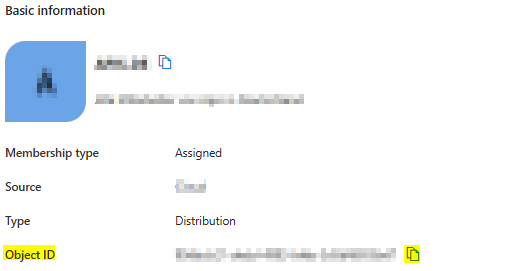
The Object ID value is needed as AZURE_LOGIN_GROUP_UUID. This configuration setting is not part of environment setup, but it’s needed on first start.
Go back to Azure Portal Home
Click in the left area menu on App registrations and click on your app to see the details:
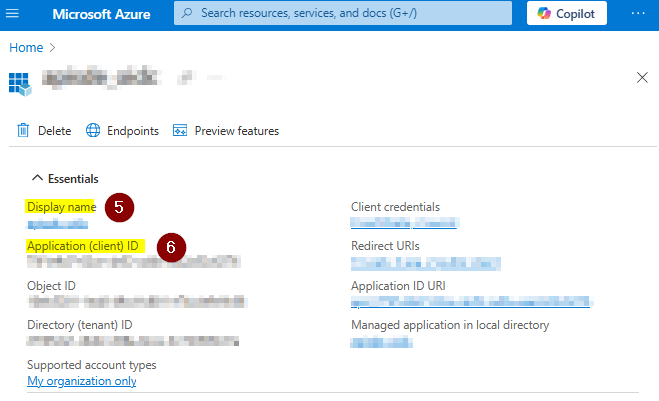
The Display Name value is needed as AZURE_CLIENT_NAME
The Application (client) ID is needed as AZURE_CLIENT_ID
The CLIENT_SECRET is configured in the App details below Client credentials on secret. Its value must be saved for later use when creating it, since it is only readable directly after adding it.
If you missed that and the value is unknown you have to recreate it as described in Azure - Configure Application and save the value as CLIENT_SECRET.
Go to the instance installation directory and open the .env.idp file with a text editor of your choice. In the file you have to write the parameter names and their assigned values in the schema ID_PROVIDER=azure
Example: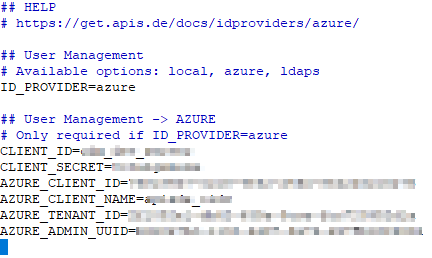
Open the CDM-Server web interface and click on Dashboard to initialize the Authentication Flow.
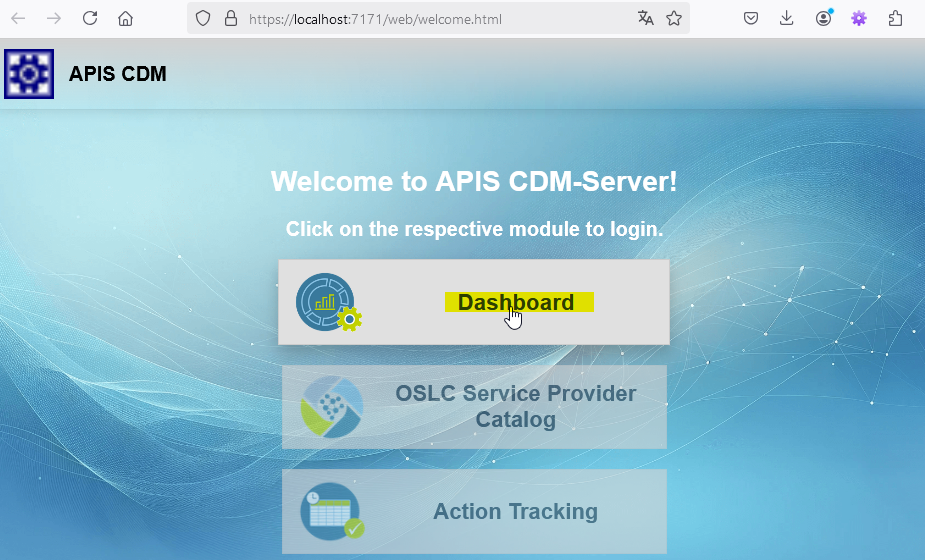
You should be redirected to Azure AD for login. Log in using the credentials of the configured admin user!
After a successful login, you’ll be redirected back to the third-party software. Confirm that the authentication and authorization are working as expected.
Open the public CDM Server Welcome Page in browser and click on Dashboard to start Azure authentication.
In the popup window enter your azure credentials to login.
If you are the admin user and configuration is completely valid you will get logged in to the CDM Server and the Admin Dashboard is shown.
Now add the ID of the group of the azure users which are allowed to log in to CDM Server in the form and click on validate.
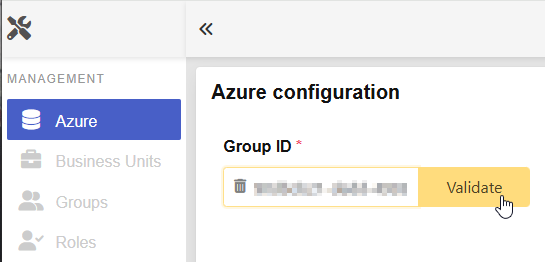
When validation succeeds the validate button changes to green

Then click on the button “Save” to store the initial configuration in the database.

To finally activate the change you have to click the “Finalize” Button. This means the configuration gets locked and is no longer editable. But you have to finalize when you are sure to enable all users in the configured group to log in to the CDM-Server.
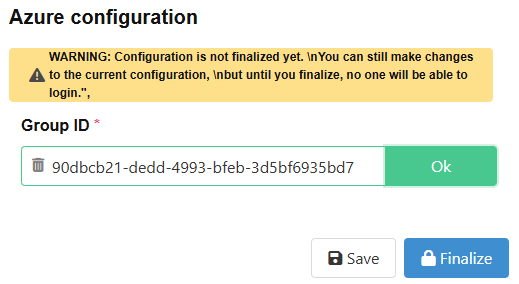
After clicking on finalize you have to confirm that you are sure and want to proceed. Confirm and select your account to log out your current azure session.
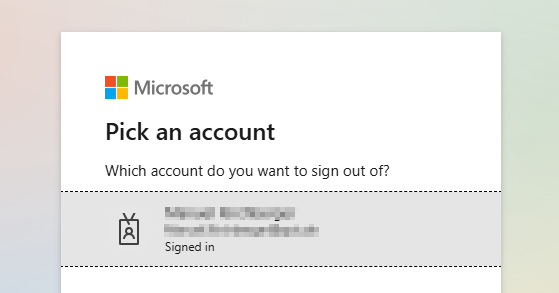
In case you logged out your current azure session you get redirected to the welcome screen and all users which are member of the login group can now log in to CDM-Server using Azure.
Possible Error Szenarios
The Login Group ID does not or no longer exist in Azure:
An error message will be displayed and saving the configuration is not possible.
Admin user is not member of the login group:
It is not possible to lock out the admin user, in this case an error message gets displayed.
Congratulations!
After succeeding all of these steps the Azure Users which are in the configured group can log in to the CDM Server!
Periodically review and renew the client secret before expiration.
Adjust permissions or application settings in Azure AD if required by the third-party software or organizational policies.
Local or Ldaps for now, you will have to clear all data and start fresh when you want to switch to Azure.Here is a sample .env.idp file with the azure IdP configured:
## HELP
# https://get.apis.de/docs/idproviders/azure/

## User Management
# Available options: local, azure, ldaps
ID_PROVIDER=azure

## User Management -> AZURE
# Only required if ID_PROVIDER=azure

# The Microsoft Azure AD Directory (Tenant) ID
# The Tenant ID is an UUID and contains hexadecimal numbers (0-9a-f) seperated by - and
# can be found in Azure Portal on the Entra-ID welcome page.
#
# Example: "e53f2a45-f4d2-a11d-223a-77b654c12df5"
AZURE_TENANT_ID=

# The Azure Application (Client) ID
# The Application client ID is an UUID and belongs to the application which is configured
# for the authentication and authorization of azure users for CDM Server. The Id can be
# found in Azure Portal -> App registrations.
#
# Example: "53a12b45-1234-5566-8fe4-93b787a787d6"
AZURE_CLIENT_ID=

# The Azure Application (Client) Name
# The Application client Name is a Text and belongs to the application which is configured
# for the authentication and authorization of azure users for CDM Server. The Name can be
# found in Azure Portal -> App registrations.
#
# Example apis_cdm_authentication
AZURE_CLIENT_NAME=

# The Azure Admin UUID
# The Azure admin UUID must be the id of the Azure user who is going to configure CDM Server at first start.
# The user which belongs to the id is then an admin user and the only user which is able to log in to the
# CDM Server to complete the configuration.
#
# To get your Azure user id log in to https://portal.azure.com/ click on view entra and in the page feed
# in the middle area of the entra welcome page the user id is shown.
#
# Example fd163a2f-112a-7291-bdf4-a4325b78910a
AZURE_ADMIN_UUID=
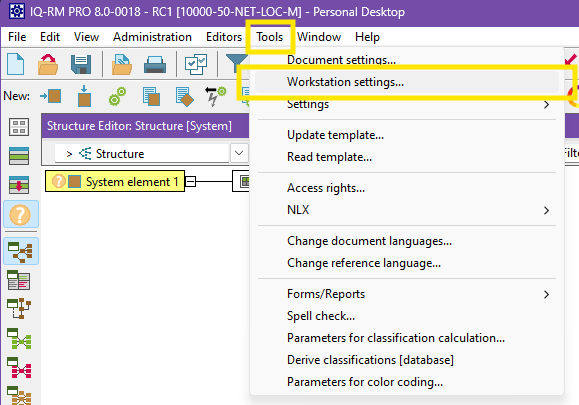
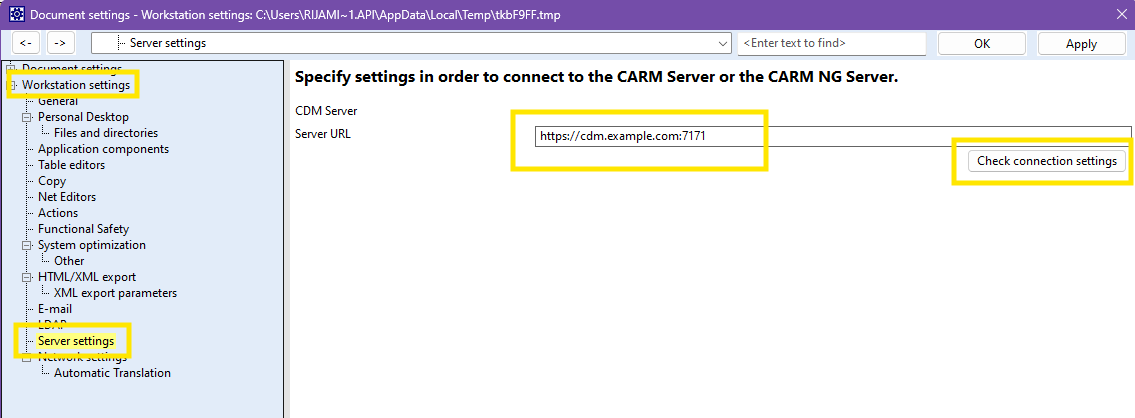
Please enter the Server URL which must include:
https:// at start:XYZ the port number at the endServer Settings entry is not available or there is no possibility to
enter a Server URL for the CDM-Server please enable Application components | CDM-Server, confirm with OK button and reopen the Workstation Settings
dialog.Click on the Check Connection Settings button to verify the connection. You should see the following message box.
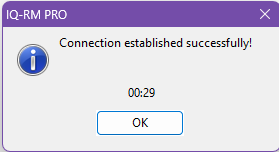
If the CDM-Server has been setup using a self-signed certificate, you will see the following error if the certificate is not installed on your system.
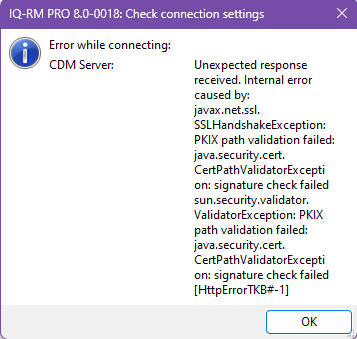
The administrator can install it using group-policy or you can install it manually. Please see Install Self-Signed Certificate for more information.
After starting the IQ-Software you have to login to the CDM-Server when
performing your first command related to the CDM server (e.g. opening the
Administration | CDM Administration). IQ-Software automatically prompts you
for your credentials. Depending on the configured ID Provider
on your CDM-Server the login procedure varies:
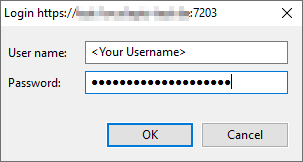
Please enter the your username and your password as set up by your CDM administrator.
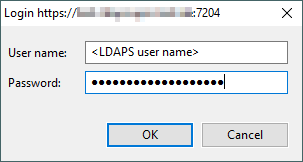
Please enter your LDAPS username and password.
You are redirected to your webbrowser which shows the Azure Login page (depending on your previous activity one of the following pages will be shown):
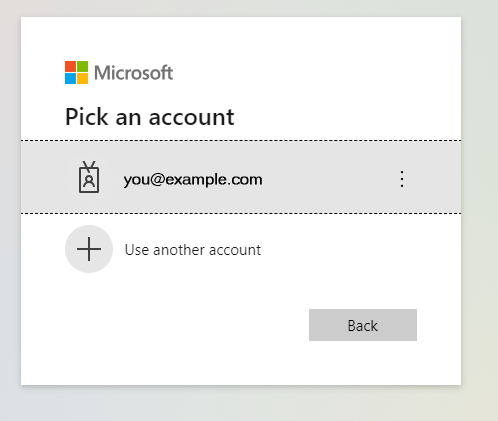 | 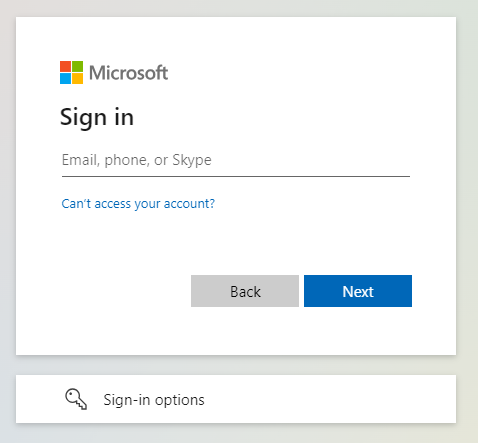 |
Select the account you want to use by clicking on it or providing your account name and clicking Next. Then enter your password on the following screen. After successful authentication, this message is shown in the browser:
Authentication complete. You can close the browser and return to the application.
Now you can close the browser (tab) and switch back to the IQ-Software window.
On subsequent login attempts you might not even need to provide your username and password and are at once redirected to a page showing the above “Authentication complete” message. In this case, simply close the browser (tab) and switch back to the IQ-Software window.
When closing the IQ-Software your login session on the CDM-Server is automatically terminated.
Should you need to log out and log in with a different user while using the
IQ-Software, please use the File | Logout and File | Login menu commands in
the Administration | CDM Administration window.
The CDM Server manages your IQ-Software data in seperate Projects. Each Project is stored on the CDM-Server in a Business Unit. These Business Units can be nested (one inside another) so that you can create tree-like structures similar to folders and subfolders within a regular file system.
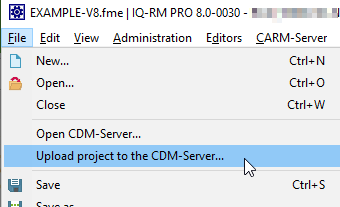
The first step to working with the CDM-Server is to upload an existing project from one of your .fme files:
File | Upload Project to the CDM-Server...Note that you can only upload a project if the file contains exactly one project. If this is not the case please reorganize the data in the file in this respect.
Alternatively, you can create a new project via context menu directly in the CDM Administration (see below).
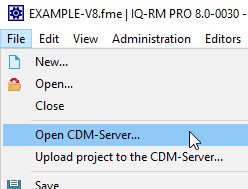
Once there are projects available on the CDM-Server, you can open a project in
the IQ-Software as easy as opening an .fme file:
Choose File | Open CDM-Server... (alternatively you can also use Administration | CDM Administration).
This opens the CDM Administration view, showing you the available Business Units and their projects:
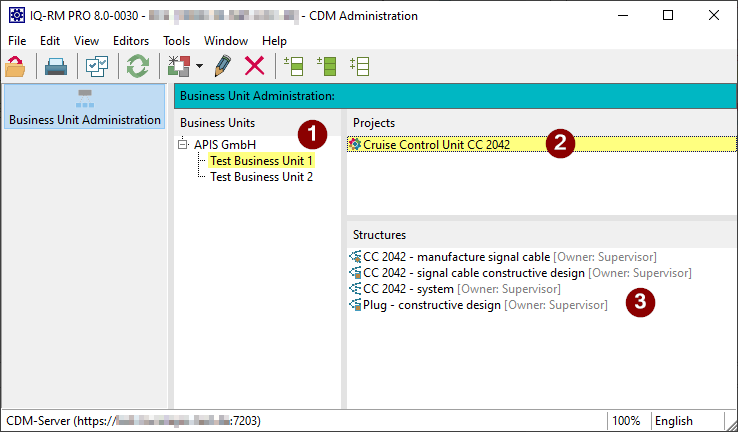
Selecting a Business Unit (1) shows you the contained Projects. When you select a Project (2), the contained structures are shown (3).
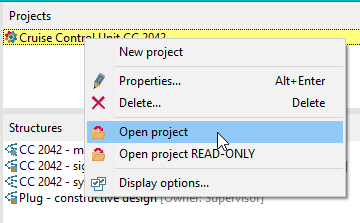
You can open a Project via the context menu or by double clicking it.
Options | Close CDM Administration when opening a project
the CDM Administration is closed automatically after opening a Project.In the CDM Administration (File | Open CDM-Server... or
Administration | CDM Administration) you can also do the following things
apart from opening a Project:
File | Login... or File | LogoutPoints 1 to 3 are available from the context menu (right-click).
The Azure page allows you to add the necessary configuration to use Azure.
This is the Group’s Object ID of the Azure Active Directory that includes all the users who need to log in to the CDM Server. The group ID identifies the specific group in your Azure AD tenant, ensuring that only users within this group are granted access to the CDM Server through Azure login.
After you have finished the setup of the Group ID, you have the possibility to save and finalize the configuration. If you wish to modify it again, before you have finalized the configuration, you are free to do so. Please note, as long as you do not finalize the configuration, no user except the admin will be able to login.
The LDAP Attribute Mapping page allows you to configure how user’s attributes from an external LDAP connection will be translated to the CDM-Server’s internal representation. In the first section you will be able to set a group dn, which will determine the users available in the system. Afterwards you can configure the individual mapping between attributes in the next section. Finally you will be able to save, review and finalize the configuration.
The first time you login (and after that as long as you have not finalized the mapping) to a freshly configured instance with an LDAP ID-Provider as the admin user, you will be automatically redirected to the LDAP Attribute Mapping Configuration page.
The next action should be to configure the group dn. Therefore navigate to the text field and enter a previously copied (to prevent typing errors) group dn into this field. Next you should validate it by clicking on the validate button.
The following results are possible:
The goal of this section is to configure a mapping between CDM and LDAP attributes, so that the CDM-Server will have a proper translation between those.
It contains a table with two columns, the CDM attributes on the left side and the LDAP attributes on the right.
On the left upper side next to the table, you can choose the type of your LDAP installation (Unix or Microsoft) depending on the type of OS on the LDAP host machine, which is used to apply a preconfigured mapping. If you do not wish for this automatism, you can choose Manual instead.
For each attribute on the left you have the following options to procede on the right:
Enter the name of an LDAP attribute: After typing in the name of an LDAP attribute you wish to map, please validate it directly afterwards. If it is valid, you will find additional information by clicking on the information icon to the right of the text field. If it is not valid, please adjust the entered name and validate again.
Enter nothing: If you enter nothing, the attribute will not be mapped.
All attributes except those marked with a star (*) are optional, you can finish the mapping without those.
After you have finished the mapping, you have the possibility to save the mapping and finalize the configuration. To do so, you may click on Finalize, which will present you a side by side comparison of your chosen mapping. Please review it carefully, because it can not be changed after you finalize the configuration.
If you wish to modify the mapping again, before you have finalized the configuration, you are free to do so. Please note, as long as you do not finalize the configuration, no user except the admin will be able to login.
The Business Units & Projects Management section allows you to organize and manage your Business Units structure and Projects. This section provides hierarchical representation of the relationships between business units and projects, and allows for easy navigation and updates.
Hierarchical Structure: The business units and projects are displayed in a tree-like format, making it easy to visualize their relationships. Business units can contain other business units and projects, helping you clearly organize your company’s structure.
Search Functionality: At the top of this section, you will find a search input that allows you to quickly locate a specific business unit or project by name.
You can manage both Business Units and Projects using a context menu that appears when you right-click on an item. Here are the available actions:
New Business Unit: Create a new business unit within the selected unit.
New Project: Create a new project within the selected business unit.
Update Business Unit: Modify the name of the selected business unit.
Delete Business Unit: Remove the selected business unit from the hierarchy.
Update Project: Modify the name of the selected project.
Delete Project: Remove the selected project from the hierarchy.
Each Business Unit and Project has a Name field, which can be defined in multiple languages. When adding or editing a name, you will see a language selector on the right side of the input field. Use this selector to specify the language for the name, allowing for multilingual support throughout your structure.
The hierarchical representation of business units and projects can be easily reorganized using drag-and-drop functionality. You can drag both business units and projects to different positions within the hierarchy to adjust the structure as needed. This makes it simple to adapt to changes in your company’s organization.
The Groups Management Interface provides administrators with the tools to organize users into groups, a fundamental component of the Role-Based Access Control (RBAC) inside the CDM-Server.
This page allows you to create, view, update, and delete groups within the system, ensuring flexible and secure user management.
There are three types of groups available on the Groups Management page:
Once a Group has been selected, in the right panel of the Groups Management page, administrators can assign or remove users from normal groups to adjust access as needed:
The Roles Management Interface allows administrators to define and organize roles within the CDM-Server.
On this page, you can create, view, and delete roles as needed, though roles cannot be updated once created. After creating roles, you can assign or remove groups to manage which users have specific access rights.
Once a role has been selected, in the right panel of the Roles Management page, administrators can assign or remove groups as needed:
The Sessions Management page lets you see and manage user sessions according to your role:
Administrators
Can view all sessions across the entire system. They can also terminate (delete) any session created by other users.
Non-Administrator Users
Can only see their own sessions. They may terminate their current sessions but cannot view or terminate sessions belonging to other users.
From here you can:
See who is logged in and from which client (Browser vs IQ-Client)
Filter sessions by any column (login, user, timestamps, etc.)
Terminate one or more sessions
| Column | Description |
|---|---|
| Login | The user’s login name |
| Name | The user’s full name |
| Client Type | How they connected: “Browser” or “IQ-Client” |
| Created | When the session was first opened |
| Last Entered | Timestamp of the most recent activity |
| Last Exited | When the session was last closed |
| Licenses | Comma-separated list of licenses currently in use |
| Current | Indicates if this session is the one you’re using (“Yes”/“No”) |
| Status | Indicates whether the session is still fully open (Active) or is in the process of being closed (Closing) |
A dialog will appear allowing you to enter an optional Reason. Click Confirm to proceed.
The Users Management Interface provides the capability to create, view, and manage user accounts.
This view provides a centralized interface to view and manage user profiles along with simplified user creation with optional system-generated passwords, workflows for password resets and forced password changes.
(This option is available only when Local is selected as the Id-Provider)
Locate the user in the table and click the Edit (pencil icon) to open the Edit User form. Update user details as necessary.
(This option is available only when Local is selected as the Id-Provider)
When a password reset is initiated for a user, a Temporary Password is generated and displayed in a pop-up. The administrator can copy this password and share it with the user.
Temporary Password Validity Temporary passwords are valid for a limited period (e.g., 2 days). If the password expires, a new reset must be initiated by the administrator.
When a user logs in using the temporary password, the system redirects the user to the Change Password dialog. The user must enter the current password (the temporary password). A new password must be set and confirmed before access is granted. Once the password is changed, the temporary password becomes invalid, and the user gains access to the system.
Users have the ability to manage their passwords directly
From the user menu in the header, select Change Password. In the Change Password dialog, enter the current password. Set and confirm a new password. Click Continue to complete the password update.
(This option is available only for LDAP and Azure as Id-Provider)
Registering an external user in the system is a crucial task that enables the CDM-Server to effectively manage and track users. Rather than duplicating user data, the server creates a reference entry in the database, allowing seamless integration of the external user into RBAC and other essential processes. This approach ensures that external users are fully enabled within the system without redundant data storage, maintaining efficient and streamlined access management.
The IQ & CDM Users Map section enables you to link IQ Persons (referred to as candidates) with CDM users.
To begin, select a project containing unapproved candidates. Only projects with unapproved candidates will be available in the project selection dialog. Candidates are considered approved once they are mapped/linked to a CDM user. Selecting a project will lock it to prevent simultaneous modifications by other users. If another user has locked the project, you will not be able to select it until they release the lock.
Once a project is selected, the left-side list will display IQ Persons (candidates) pending a match. Use the additional filter at the top of the list to refine your list as needed. Candidates are displayed with their Name, First Name, and E-mail by default. To reveal more details, click the button next to the “UNAPPROVED CANDIDATES” title. Changes to the displayed attributes are saved automatically and will be applied the next time you use the tool.
In the next step, you can search for CDM users by applying search criteria, then clicking “Search”. Users appear with their Login and First Name by default, but additional details can be displayed by clicking the button next to the “USERS” title. These display settings are saved for future sessions.
If the required CDM user does not exist, you can create a new user by selecting the “New User” option. This option is available only if you are using local as the IdProvider on the CDM Server and you have admin privileges.
To match a candidate with a user, select at least one candidate from the left list and exactly one user from the right list. This enables the " » " button, allowing you to move candidates to the user.
NOTE: This won’t perform any definitive change.
After mapping candidates to users, review the changes before applying them. Each candidate (IQ Person) can be mapped ONLY ONCE; this is a permanent action and cannot be undone. If you are ready to proceed, click the confirmation button to finalize the mappings.
Once a candidate is mapped, they are considered approved and will be removed from the candidate list. If no candidates remain, the project selector will clear, and the project lock will automatically be released.
Click “Reset” to clear your progress, including any selected project, releasing the lock on the project and clearing all changes made in the current session.
The Settings page allows all users to customize system preferences, including language settings and user interface layout. Changes made on this page are applied upon saving, and the page will automatically reload to reflect the updates.
The General tab in the Settings page allows users to adjust their system-wide preferences, including language options and UI layout.
The Users tab in the Settings page allows users to configure how attributes are displayed in the Users Management interface.
Attribute Order The Attributes Order section lets users reorder the fields displayed in the Users table, such as Title, Name, Login, Department, Email, Phone, and more. To reorder attributes:
The Administration tab in the Settings page allows the Administrators to change configuration properties.
The Role-Based Access Control (RBAC) section enables efficient management of user permissions across your organization by assigning users to groups, groups to roles and roles to permissions.

Role-Based Access Control (RBAC) centers on using a small set of rules to determine whether a particular user is permitted to perform an operation x on an object o. In the RBAC model, the constructs of groups and roles facilitate the efficient assignment of permissions to a potentialy large set of users. Groups aggregate users into a smaller number of entities, which are equivalent from an RBAC perspective, while roles bundle permissions into manageable units that can be assigned collectively, enabling users to carry out specific tasks. A permission, in this context, represents the combination of an operation with an object.
Regarding operations, the CDM RBAC model supports only two: READ and WRITE. Important: The permission to WRITE an object also allows to READ that object. A key aspect of permissions is efficiently defining sets of objects. The model takes advantage of the fact that objects within the IQ FMEA model can be organized as part of a vast family tree. Unlike a traditional family tree, however, the RBAC tree does not differentiate by gender—it simply consists of parent and child members.
Child members fall into two categories: some are intended to become parents themselves (e.g., business units), while others remain terminal (e.g., projects). In a conventional family tree, the structure starts with a progenitor. In contrast, the RBAC tree begins with a business unit representing the entire organization managed by the CDM server. From this root, children can either be parent elements (business units) or terminal elements (projects), allowing the tree to grow recursively to capture increasingly detailed levels of the organization.
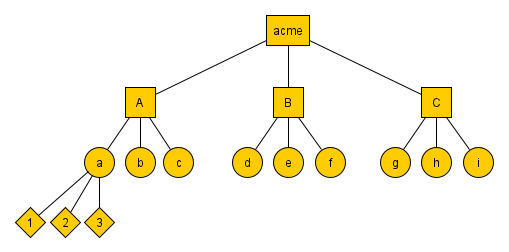
In CDM RBAC roles need not be created globally but can be restricted to parts of the organization. Roles are created from Role templates and a member of the tree. Let’s assume your organization is divided into three departments called A, B and C whose common parent is the progenitor (member representing the organisation as a whole).
An abstract tree view of this organization called acme would look like the following diagram
The CDM RBAC provides three role templates:
Users are classified into two categories based on the given rights at the specified level in the organization’s tree:
You may create an Admin, an Editor and a Viewer role for department A (called Admin - A, Editor - A, Viewer - A). These three roles in isolation have no effect. You need to create groups in addition. Let’s assume you create three groups called AdminGroupA, EditorGroupA and ViewerGroupA and assign the AdminGroupA to role Admin of A, EditorGroupA to role Editor of A and ViewerGroupA to role Viewer of A. As the last step users are assigned to the three groups. Assuming 10 users work in department A, and you assign Chad and Julia to the AdminGroupA, John, Vitali, Manuel to the EditorGroupA Christoph, Andreas, Johannes and Conny to group ViewerGroupA. In addition there are two admins named Donald and Korbinian.
As a first step Korbinian logs into the Dashboard of the CDM-Server. After clicking on Business units he would see the following
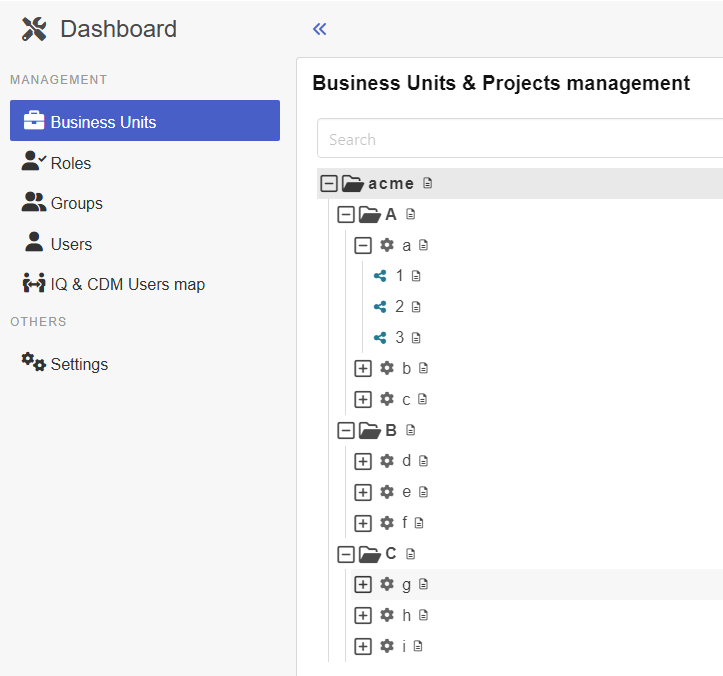
Clicking on Roles and selecting the Admin - A role this is presented

And after clicking on Groups and selecting AdminGroupA this:

What effect will this have on the individual users after the login to the CDM-Server?
To answer this question Julia logs into the Dashboard and clicks on Business Units
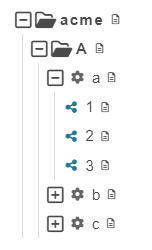
Julia cannot see the Business Units B and C because she does not own Roles that gives her read permissions on those Business Units. But she can see Business Units acme and A and all descendants of A. She owns the Admin - A role which according to the definition above assigns write permissions for A and its descendants to Julia. Two additional rules of RBAC of CDM-Server are at play here that extends the permissions of Julia beyond those explicitly defined by the roles:
The first rule allows Julia to read A and all its descendants and the second rule allows Julia to read the acme node of the tree. If she clicks right on the Business Unit acme a context menu is shown
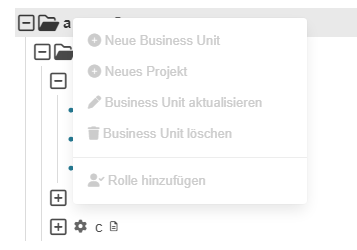
All potentially possible actions are shown but in this case each one is shown deactivated because Julia does not have write permissions on this tree node.
The context menu of Business Unit A
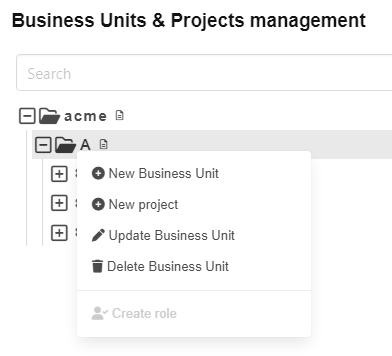
Here the picture is mixed. 3 actions are activated and 2 are deactivated. This situation relates to the third rule of RBAC of CDM-Server
Business Units and Projects (but not Structures) can be moved by drag and drop in the Business Units view.Assume a user wants to move a tree node n with parent s (source parent) to a new parent t (target parent). Such a move is sequence of actions:
Consequently, considering rule 3, the user needs the following permissions:
(a) write permission on n (b) write permission on s (c) write permission on t
Now Julia opens the context menu of Project a
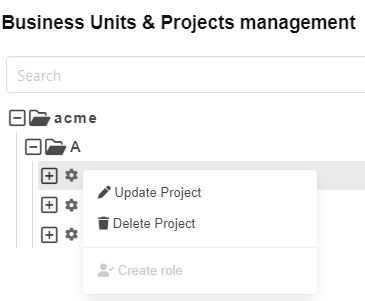
As Julia owns the write permission on A all actions for non admin users are possible. Roles can only be created by admin users (see below).
You might miss the action ‘Create structure’ here. But this is beyond the functionality of the dashboard and is only offered by the APIS IQ-Software. The RBAC of CDM-Server is not restricting this.
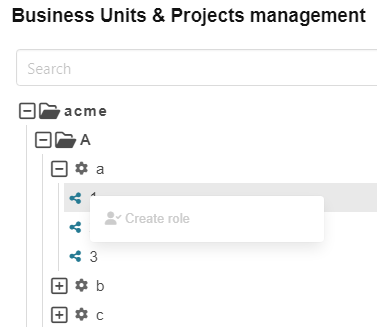
Last but not least Julia right-clicks on the structure 1
Next Vitali logs into the Dashboard of the CDM-Server. He sees the same tree as Julia in the Business Units view. The context menu of acme is also identical but the context menu of A is different.
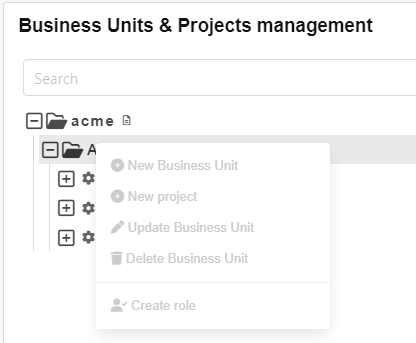
Vitali is in the EditorGroupA group which is connected to Role Editor - A. Recalling the definition of the Role template Editor above let’s you note that this role does not include WRITE permission on the tree node it is defined on. In combination with rule 3 it is evident that Vitali cannot use any action provided in the Dashboard on tree node A.
As follows from the discussion above the context menus for Project a and Structure 1 are identical to Julia’s.
Finally Johannes logs into the Dashboard of CDM-Server.
The Business Unit view is the same as for Julia and Vitali. The context menus of all levels that Johannes can see will only contain deactivated actions because the only Role that Johannes owns is the Viewer - A Role. The description of the Role template Viewer specified that only READ permissions are given to a user by that role. Because all actions change some aspects of the data model, and therefore would need WRITE permissions, none of the actions is available if a user only owns READ permissions.
This ends the tour!
The major elements of RBAC of Apis CDM-Server have been presented. More information can be found in the sections on ID_PROVIDERs LOCAL, LDAP and Azure and special sections on Users, Groups and Roles.
The Users Management is the essential first step in defining and organizing access permissions, as all subsequent groups, roles and permissions rely on the accurate setup of user accounts.
Regardless of the chosen ID Provider, configuring users in the User Management section establishes the essential foundation for RBAC (Role-Based Access Control), enabling robust, secure, and scalable access control across the system.
By establishing users first, the organization can easily assign them to groups and later link these groups to roles as needed, creating a scalable, manageable RBAC hierarchy.
For detailed guidance on managing users, visit the Users page.
The Groups Management is a central component in the system’s Role-Based Access Control (RBAC) in the CDM-Server. It enables administrators to create, edit, view, and delete Groups—the critical link between users and roles. By assigning users to groups, and then associating those groups with roles, you can efficiently manage permissions across the organization without needing to configure each user individually.
Groups act as a bridge between users and roles. By defining permissions at the group level, administrators can simplify access control, making it easier to manage permissions for multiple users at once.
For detailed guidance on managing groups, visit the Groups page.
The Roles Management section is the final and essential piece of the Role-Based Access Control (RBAC) in the CDM-Server.
Roles define specific permissions within the system, determining what actions can be taken and what resources can be accessed by groups and their members. Roles are the end-point in the RBAC hierarchy, serving as the permission layer that applies to users indirectly through their assigned groups.
In the CDM-Server there are 3 predefined Role Template s which already have specific permissions:
For detailed guidance on managing roles, visit the Roles page.
/ instead of web/welcome.html ( Documentation ).The automatic backup system is integrated into the CDM-Server. It does not function when the CDM server is down.
Every night at 2:00 AM, a daily compressed backup file in the .tar.gz format is created in the .backups folder. This file, in turn, contains a highly compressed file named db.tar.gz, which holds all the database files required for restoring a database. Additionally, the backup file in the uploads folder contains binary blob files that belong to the CDM server’s data model but are stored outside the database for performance reasons. The name of the backup file is generated according to the following pattern:
cdm_backup_<database-version>_<date>.tar.gz
The date follows the format %Y%m%d%H%M%S and is based on the host system’s time zone. Here is an example of a backup file name created on December 12, 2024, starting at 2:00 AM, with the database version 16:
cdm_backup_16_20241212020000.tar.gz
Backup files older than 30 days are automatically deleted. The backup files are created without significantly affecting the database operations.
Preserving backup files for longer than 30 days is your task. Please make sure you copy the backup files to a save place before they get deleted.
Backups can also be manually initiated if needed (e.g., before deploying a new CDM server version). To do so, simply run the shell script:
sudo ./backup
The CDM-Server needs to be active for the backup to work. The backup is created without significantly affecting database operations. A manual backup must not be started while an automatic backup is running. The backup file is generated using the same pattern as the automatically created backup files and is located in the same folder. It is also named according to the same format and is also automatically deleted after 30 days.
To do this, run the script
sudo ./restore
Then, the instructions of the script must be followed. The script instructions are only available in English. The script stops the CDM-Server. If the script runs successfully, start the CDM-Server again using
sudo ./start
We automatically run some maintenance tasks on the data and database every week on Sunday at 00:00 and 04:00 (Server time).
sudo ./backup and sudo ./restoresudo ./backup
pg_basebackup: initiating base backup, waiting for checkpoint to complete
pg_basebackup: checkpoint completed
pg_basebackup: write-ahead log start point: 0/E6000028 on timeline 1
pg_basebackup: starting background WAL receiver
pg_basebackup: created temporary replication slot "pg_basebackup_292042"
pg_basebackup: write-ahead log end point: 0/E6000100
pg_basebackup: waiting for background process to finish streaming ...
pg_basebackup: syncing data to disk ...
pg_basebackup: renaming backup_manifest.tmp to backup_manifest
pg_basebackup: base backup completed
Database and files backup completed.
Backup of database and files completed.
sudo ./restore
Page: 1 of 4

1. cdm_backup_16_20250221080438.tar.gz
2. cdm_backup_16_20250221075006.tar.gz
3. cdm_backup_16_20250221020000.tar.gz
4. cdm_backup_16_20250220020000.tar.gz
5. cdm_backup_16_20250219020000.tar.gz
6. cdm_backup_16_20250218020000.tar.gz
7. cdm_backup_16_20250217020000.tar.gz
8. cdm_backup_16_20250216020000.tar.gz
9. cdm_backup_16_20250215020000.tar.gz
10. cdm_backup_16_20250214020000.tar.gz

Enter the number to select a backup, 'n' for next page, 'q' to quit.
Choose an option: 1
Selected backup: cdm_backup_16_20250221080438.tar.gz
Are you sure you want to restore this backup? (y/n): y
Validating the backup file...
Backup file validated successfully.
Stopping the app and database container...
Stopping the server with Docker Compose...
[+] Running 7/7
✔ Container main-proxy-1   Removed                                                                                                                                                          0.9s
✔ Container pfx-converter  Removed                                                                                                                                                          0.0s
✔ Container cdm-web-1     Removed                                                                                                                                                          0.2s
✔ Container cdm-app-1     Removed                                                                                                                                                          2.3s
✔ Container main-db-1      Removed                                                                                                                                                          0.4s
✔ Network main_default     Removed                                                                                                                                                          0.2s
✔ Network main_common-net  Removed                                                                                                                                                          0.3s
Server stopped successfully!
Server stopped successfully!
Restoring the backup...
Database and file restoration process completed.

sudo ./start
If the service worker fails or is unavailable, the following issues may arise:
If you’re experiencing issues with the service worker, here’s what you can do to resolve it:
Check Browser Support
Ensure that your browser supports service workers. Most modern browsers support them, including:
Some browsers may block service workers in certain modes, so be sure to check your browser’s settings.
For a detailed list of supported browsers and any known compatibility issues, please refer to the official Service Worker Browser Compatibility page on MDN Web Docs.
Verify the Service Worker is Active
Use the browser’s developer tools to check if the service worker is registered and active. Here’s how:
F12).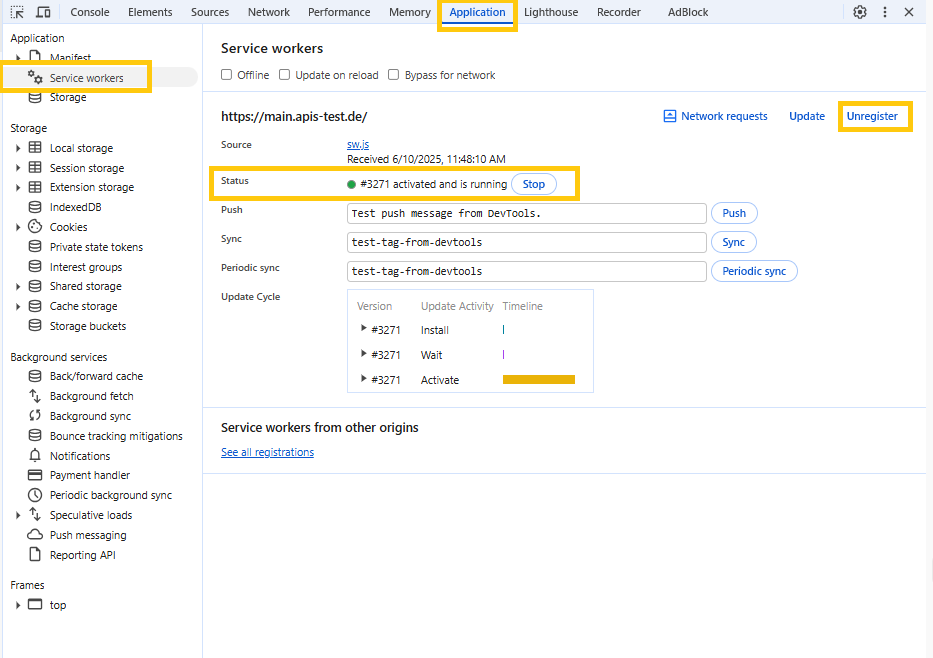
Re-register the Service Worker
If the service worker is not active or seems outdated, try re-registering it:
F12).Look for Fallback Notifications
The application may display a warning if the service worker is unavailable. Pay attention to any messages or prompts in the app that provide more details or steps to take.
In the .logs directory, you can find all the logs generated by the server.
There are also some logs generated by OCI containers. You can find them in the /var/lib/docker/containers (or equivalent if you are using something else) directory.
For database, 10x 10mb files are retained. For application, 10x 100mb files are retained.
Windows Store, Search for Ubuntu (by Canonical Group Limited) and Install itUbuntu from START and follow the instructions to set up your user inside WSL Ubuntucd ~ && mkdir cdm && cd cdm~/cdm directoryCDM_HOST should resolve to the server’s IP addressWe provide the SBOM in OWASP’s CycloneDX v1.5/v1.6 format which has been officially ratified as an Ecma International standard.
You can find the SBOM for CDM-Server here:
v1.4.0: JSON 1 | Summary 1 || JSON 2 | Summary 2v1.3.0: JSON 1 | Summary 1 || JSON 2 | Summary 2v1.2.1: JSON 1 | Summary 1 || JSON 2 | Summary 2v1.2.0: JSON 1 | Summary 1 || JSON 2 | Summary 2v1.1.1: JSON 1 | Summary 1 || JSON 2 | Summary 2v1.1.0: JSON 1 | Summary 1 || JSON 2 | Summary 2v1.0.1: JSON | Summaryv1.0.0: JSON | SummaryCDM-Server also utilizes:
First, you receive the certificate from the administrator. Then, you can install it using the following steps:
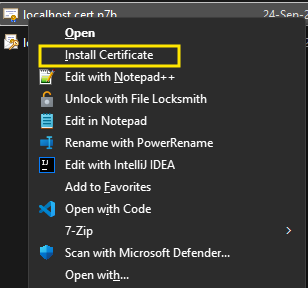
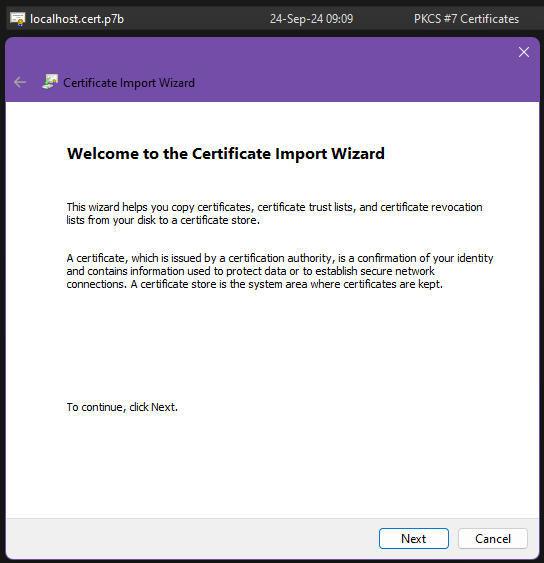
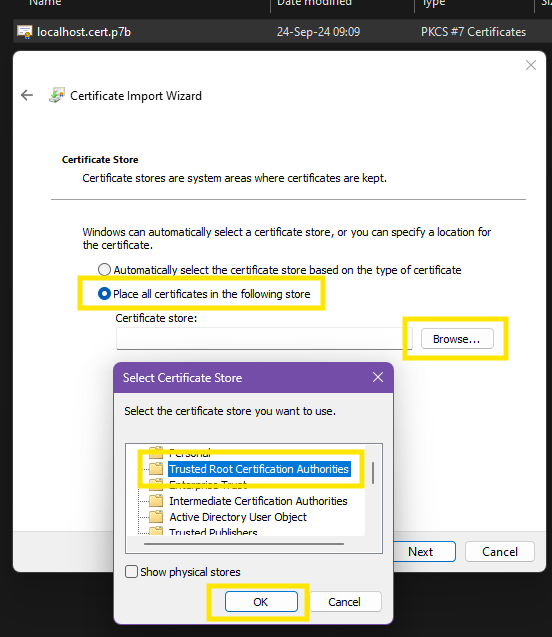
This section contains the help and manual of older versions of the software in PDF. It is not recommended to use these versions, but if you need to, you can find the documentation here.