ID Provider
Details on the ID Providers supported by the CDM-Server and how to configure .env.idp file.
The CDM-Server supports various ID Providers (IdP) for authentication and user management. You need to choose one according to your organization’s requirements and configure it accordingly.
What is the Benefit
Main reason to use non-local IdP is to allow users to use their existing corporate credentials to log in to the CDM-Server.The CDM-Server supports the following ID Providers:
- Local - Users are managed internally by the CDM-Server. Easiest to set up and use.
- LDAPS - Users are managed by an LDAP server. Requires an external LDAP server present.
- Azure - CDM-Server uses Microsoft Azure for authentication.
How to Configure
- The ID Provider configuration is done using the
.env.idp file. - For information about
.env file, please go to the Setting Up .env File page.
WARNING
At this moment, you can not change the ID provider once the server is started. Please be sure to finalize the configuration before starting the server.1 - Local
How to set up the local identity provider.
This IdP is the default IdP for the CDM-Server. It is used to authenticate users against the local user database. It uses an industry standard hashing algorithm to store passwords securely and authenticate users against the stored hash.
All passwords require rotation every 180 days and must be at least 8 characters long. The admin can reset passwords for users if needed.
Configuration
In the .env.idp file, the following variables are used to configure the local IdP:
## HELP
# https://get.apis.de/docs/idproviders/local/

## USER MANAGEMENT
# Available options: local, azure, ldaps
ID_PROVIDER=local

### User Management -> LOCAL
# Only required if ID_PROVIDER=local
# We will create one root admin user using credentials below
# You will need to change password after login

## Root User Login
# Example: admin
ROOT_LOGIN=

## Root User Password
# Must be at least 8 characters long.
# Don't use special characters.
ROOT_PASSWORD=
Note
It is recommended to use simple English characters for the ROOT_LOGIN and ROOT_PASSWORD values.Warning
You will be unable to start the server if the password is not set or smaller than 8 characters.Example
ID_PROVIDER=local
ROOT_LOGIN=admin
ROOT_PASSWORD=admin1234
Change Password
The admin should login as soon as possible and should change the password.2 - LDAPS
Step-by-step guide to configure LDAPS as an identity provider for CDM Server.
CDM Server includes a built-in LDAPS Identity Provider that allows the server to connect securely with your company’s LDAP directory.
This connection uses a connection pool — a single LDAP user account (called the connection account) is used for all LDAP queries from CDM Server.
Note:
All LDAP operations are performed using the permissions of the connection account, not the individual user’s permissions.
CDM Server only needs read access to users and groups under one LDAP main node relevant to CDM workflows.
Prerequisites
Before you begin, make sure you have:
- An existing or new Login Group and Admin User in CDM Server for the setup.
- A valid TLS certificate for your LDAP server (TLS 1.3 is required).
- To allow the CDM-Server to connect to your LDAP server the certificate of the LDAP server must be copied to the root folder of the CDM-Server and named:
- The file content needs to be in PEM format.
How Authentication Works in CDM-Server
Once configured, CDM Server uses LDAPS to:
- Verify user credentials with your company’s LDAP server.
- Map LDAP group memberships to CDM Server roles automatically.
This means users are automatically assigned to CDM roles that match their LDAP groups.
Tip:
All users who need CDM Server access must belong to the same LDAP group.
This group must be configured as the Login Group when starting CDM Server for the first time.
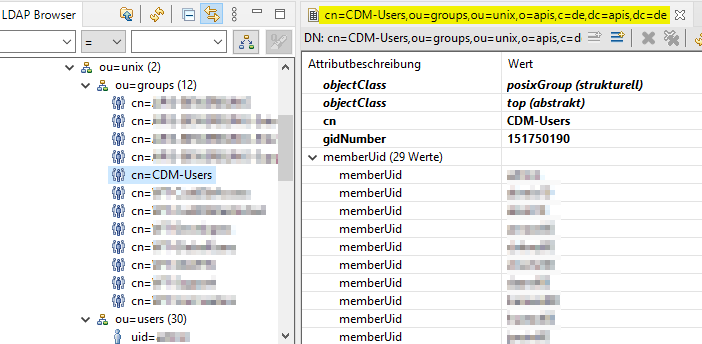
In the image above, the group called CDM-Users includes all users allowed to log in to CDM Server.
Example Configuration
Here’s a sample .env.idp file showing how to configure the ldaps identity provider:
## HELP
# https://get.apis.de/docs/idproviders/ldaps/

## User Management
# Available options: local, azure, ldaps
ID_PROVIDER=ldaps

### User Management -> LDAP
# Only required if ID_PROVIDER=ldaps
# LDAPS server host
AUTH_HOST=

## LDAPS server port
# Change it if you are using a different port
AUTH_PORT=636

## The DN of the user to use to query the LDAP server. This user must have read access to the LDAP server.
# Example: uid=admin,ou=users,o=companyname,dc=domainname,dc=country
AUTH_USER=

## Password for that user
AUTH_PASSWORD=

## User Management -> LDAP -> Internal References
# The full DN of the user in LDAP who is considered admin (This account is needed for server setup)
# Example: uid=admin,ou=users,o=companyname,dc=domainname,dc=country
LDAP_ADMIN_DN=

## The base DN for the LDAP group tree
# Example: ou=groups,o=companyname,dc=domainname,dc=country
LDAP_GROUP_TREE_DN=

## The template for the login name. This is used to construct the full DN of the user to authenticate.
# Must contain {loginName} as a placeholder for the login name.
# Example: uid={loginName},ou=users,o=companyname,dc=domainname,dc=country
LDAP_LOGIN_TEMPLATE=

## USE CUSTOM TLS CERTIFICATE FOR LDAPS (PUBLIC-KEY)
# We always use TLS for LDAP.
# If you have a self-signed certificate for your LDAP instance, set this to true.
# You need to place the custom certificate (public key) in the same directory as your `docker-compose.yml` file (where you have downloaded CDM-Server).
# The certificate file name must be `cdm-ldaps.pub` and it must be in PEM format.
# For a false value, we will attempt to validate the LDAP-Server certificate and it will fail for self-signed/expired certificates.
# Default is false
LDAP_CUSTOM_CERT=false
Inital CDM Server configuration workflow
Before you start CDM Server for the first time, define the admin and group settings in your environment (Docker container).
The following parameters must be set:
| Environment Param | Example Value | Description |
|---|
| ID_PROVIDER | ldaps | LDAP is used as idprovider |
| AUTH_HOST | openldap.companydomain.country | Network address of the ldap service |
| AUTH_PORT | 636 | The port of the ldap TLS connection |
| AUTH_USER | uid=root,ou=users,o=company,dc=domain,dc=country | User dn of the connection pool user account |
| LDAP_ADMIN_DN | uid=admin,ou=users,o=company,dc=domain,dc=country | Distinguished name of the admin user account |
| LDAP_SEARCH_PATH | o=company,dc=domain,dc=country | Search path containing users and groups in its sub tree |
Next Step
Once you set up
.env.idp and login to the system for the first time, you need to do a mapping. Please follow
this guide.
3 - Azure
How to set up the Azure identity provider.
Setup Instructions for connecting CDM Server to Azure
Purpose
This guide provides information and instructions for configuring CDM Server to log in using Microsoft Azure AD as Identity Provider.
Prerequisites
To be able to use Microsofts Azure Entra ID as ID Provider in CDM Server you need to make some configurations in Azure. Therefor you need
- Access to the Azure Portal.
- Permissions to create and manage Azure AD applications.
- The client redirect URI from the CDM-Server.
Tipp
CDM Server users from external systems which should be able to access CDM-Server must be member of the same group. This group must be configured by Admin user as Login Group at first CDM-Server start.
Warning About Data Loss
Please note that, at this moment, we do not support changing the IdP without clearing all data. This means, if you set up a CDM-Server instance for testing
using Local or Ldaps for now, you will have to clear all data and start fresh when you want to switch to Azure.Here is a sample .env.idp file with the azure IdP configured:
## HELP
# https://get.apis.de/docs/idproviders/azure/

## User Management
# Available options: local, azure, ldaps
ID_PROVIDER=azure

## User Management -> AZURE
# Only required if ID_PROVIDER=azure

# The Microsoft Azure AD Directory (Tenant) ID
# The Tenant ID is an UUID and contains hexadecimal numbers (0-9a-f) seperated by - and
# can be found in Azure Portal on the Entra-ID welcome page.
#
# Example: "e53f2a45-f4d2-a11d-223a-77b654c12df5"
AZURE_TENANT_ID=

# The Azure Application (Client) ID
# The Application client ID is an UUID and belongs to the application which is configured
# for the authentication and authorization of azure users for CDM Server. The Id can be
# found in Azure Portal -> App registrations.
#
# Example: "53a12b45-1234-5566-8fe4-93b787a787d6"
AZURE_CLIENT_ID=

# The Azure Application (Client) Name
# The Application client Name is a Text and belongs to the application which is configured
# for the authentication and authorization of azure users for CDM Server. The Name can be
# found in Azure Portal -> App registrations.
#
# Example apis_cdm_authentication
AZURE_CLIENT_NAME=

# The Azure Admin UUID
# The Azure admin UUID must be the id of the Azure user who is going to configure CDM Server at first start.
# The user which belongs to the id is then an admin user and the only user which is able to log in to the
# CDM Server to complete the configuration.
#
# To get your Azure user id log in to https://portal.azure.com/ click on view entra and in the page feed
# in the middle area of the entra welcome page the user id is shown.
#
# Example fd163a2f-112a-7291-bdf4-a4325b78910a
AZURE_ADMIN_UUID=
3.1 - Azure Portal Setup
How to configure an Azure application as Identity Provider.
The CDM Server supports authentication of users on behalf of Microsoft Azure. In Azure an application needs to be configured which provides the authentication flow.
Step 1: Start with the app registration
Open azure portal in Web Browser and click on App registrations
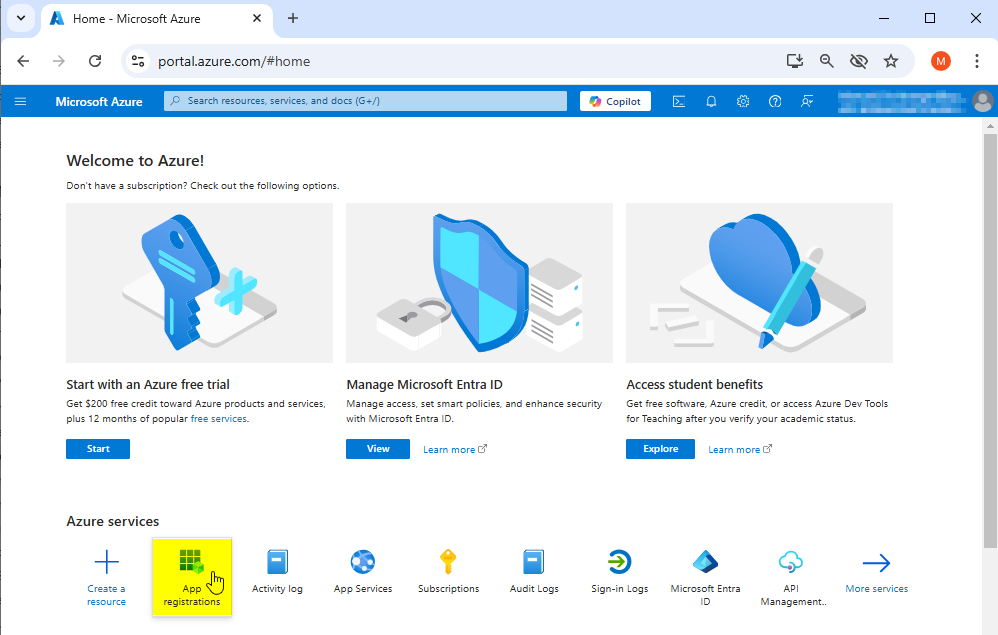
Now the app registrations page shows the registered azure apps.
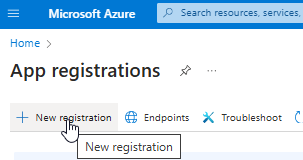
- Click on “+ New registration” to register a new application in azure
An application registration form is shown
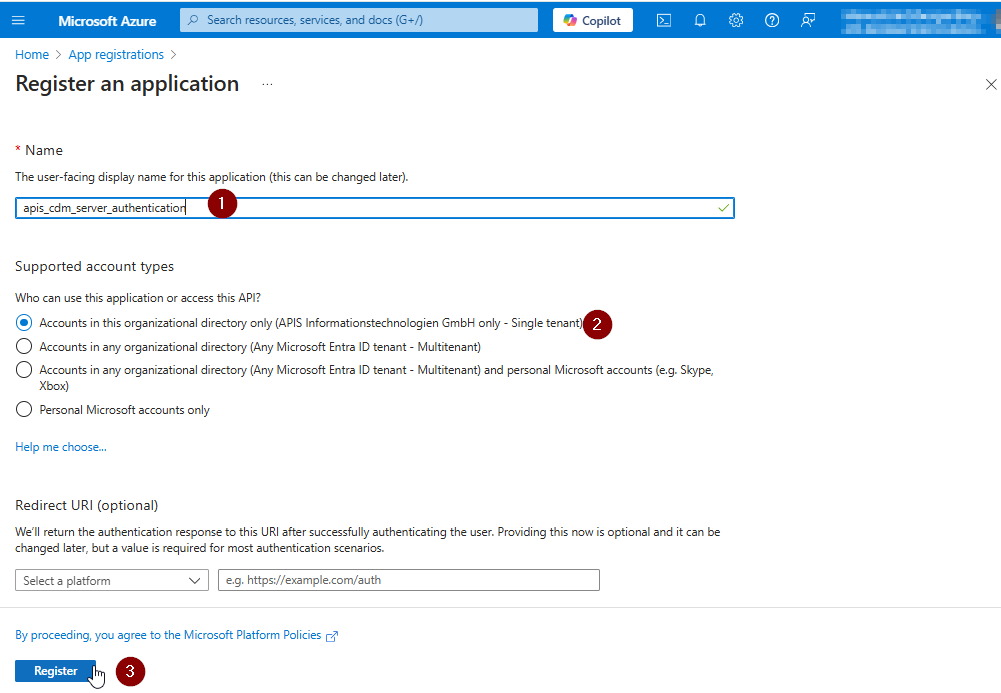
- Enter the mandatory name
- Select a supported account type which matches your requirement
- Skip the step to add redirect URL here for now, we need more than one url, this can be done later.
- Click on Register, you will see the details of the registered app next
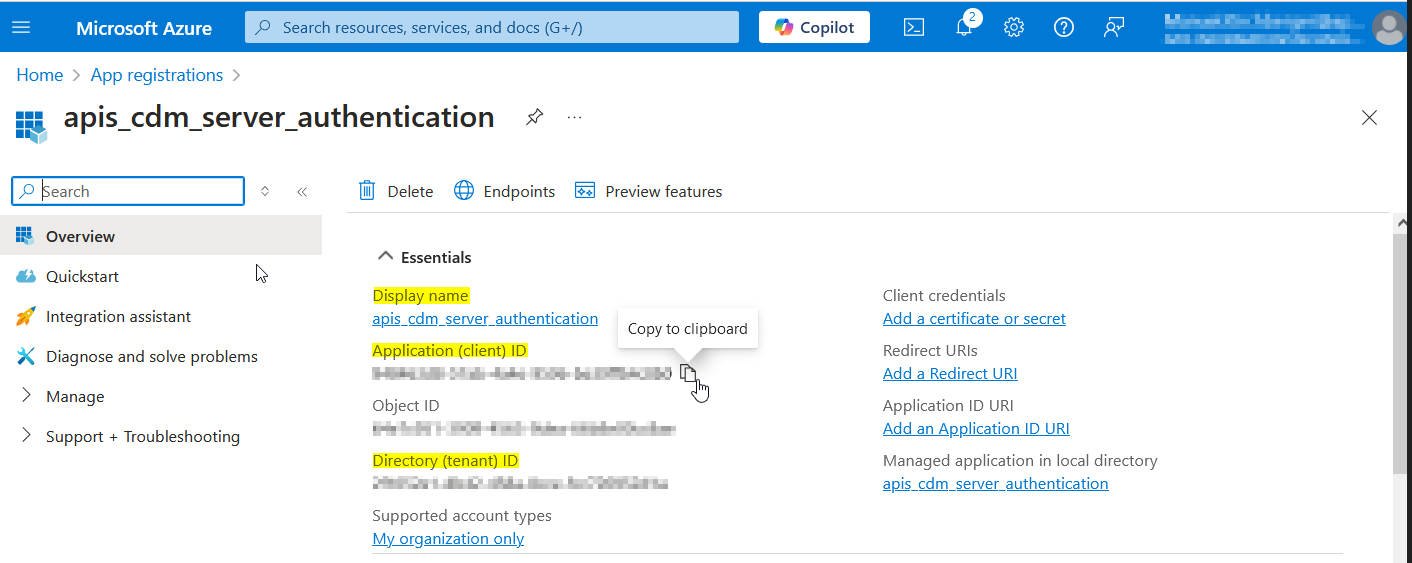
The values of the yellow highlighted fields are necessary for later use in CDM Server configuration. The Ids can be copied moving the mouse pointer to the right end of the value.
Please note the values for the following CDM Parameters for later use:
| CDM Parameter | From |
|---|
| AZURE_CLIENT_NAME | Display name |
| AZURE_CLIENT_ID | Application (client) ID |
| AZURE_TENANT_ID | Directory (tenant) ID |
Redirect URIs
Note
Once a user is authenticated by Azure, it sends an authentication information back to the CDM Server. The same happens in the logout workflow. Therefore some Redirect URIs must be defined for the Application.To configure allowed redirect destinations click on Add a Redirect URI on the Application details page.

In the following page click on + Add a platform.
As a result a new form opens on the right side where you can select the type of platform.

Choose Single-page application here.

Enter CDM Server redirect URIs for login and logout in the Redirect URIs fields.


Warning
Make sure the URIs here are exact, as mismatched URIs will cause authentication errors.For IQ Client an additional configuration is needed, add a second platform

Choose Mobile and Desktop applications here.
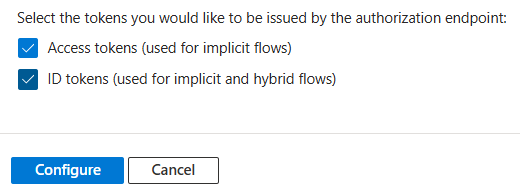
Enter IQ Client redirect URIs for login and logout in the Redirect URIs fields:
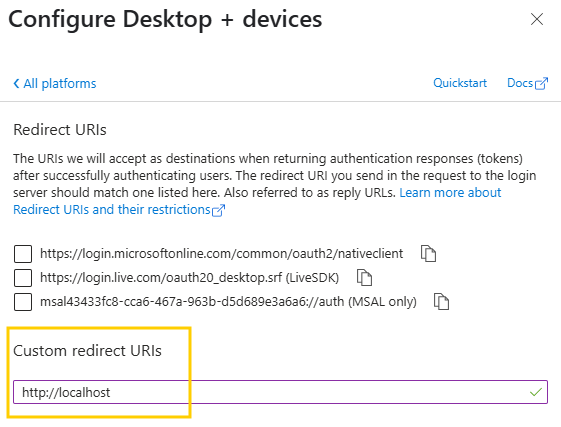
Token settings
At the bottom of the form enable Access tokens and ID tokens:
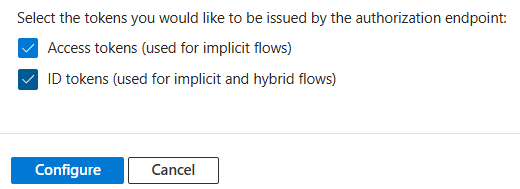
Then click on Configure to finish the configuration.
Application Permissions
In the left menu select API permissions.
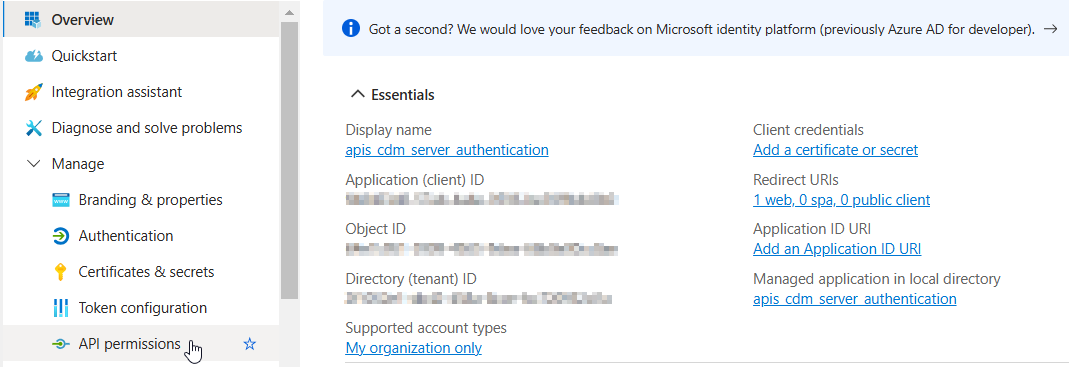
Add Permissions:
Click + Add a permission.

Select Microsoft Graph and then Delegated permissions.
Add the permissions
- openid
- profile
- email
- User.Read
- Directory.Read.All
- Group.Read.All
- GroupMember.Read.All
If prompted, click Grant admin consent for the selected permissions. (This step may require admin privileges.)
The result should look like this:
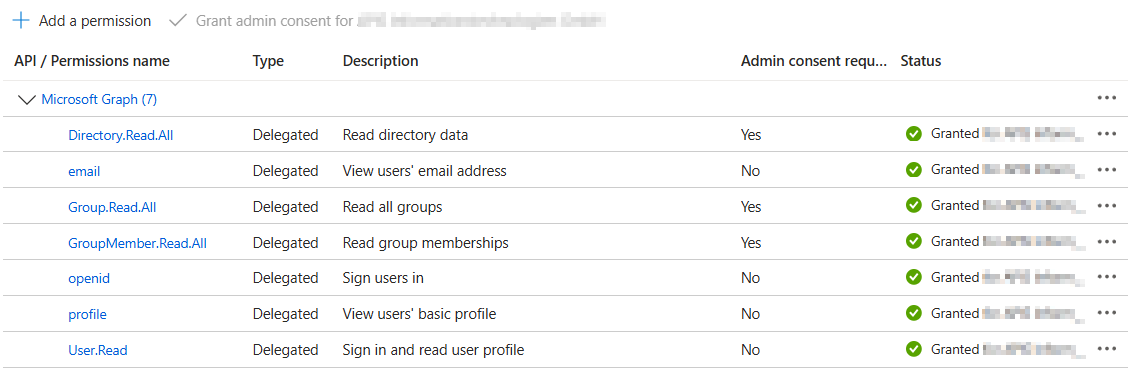
The permissions Directory.Read.All, Group.Read.All and Group.Member.Read.All need Admin consent and are necessary to be able to read members of groups and groups of users which is necessary to provide RBAC flows in CDM Server which are based on group structures in external ID Providers.
3.2 - Configure CDM-Server
How to configure CDM-Server to use the Azure application for authentication.
Prerequisites
To be able to configure the CDM-Server to start and for later use by members of a configured group, you need some values from the Azure Portal.
| # | Name | Description | Usage |
|---|
| 0 | ID_PROVIDER | Fixed value “azure” | Environment |
| 1 | AZURE_TENANT_ID | The Directory (Tenant) ID | Environment |
| 2 | AZURE_ADMIN_UUID | The Admin User’s Object ID | Environment |
| 3 | AZURE_LOGIN_GROUP_UUID | The Login Group’s Object ID | Start Config |
| 4 | AZURE_SCOPE | Fixed value “Read.users” | Environment |
| 5 | AZURE_CLIENT_NAME | Name of the application | Environment |
| 6 | AZURE_CLIENT_ID | ID of the application | Environment |
| 7 | AZURE_CLIENT_SECRET | Secret value of the application | Environment |
Collect the values provided by Azure
The ID_PROVIDER for Azure is fixed and must be set to value azure in the environment.
First we will collect the Azure Tenant-ID, an admin user ID and a login group id.
The Admin user is able to log in to a fresh system to configure the necessary base settings.
Log in to Azure Portal
On the Welcome Page below Manage Microsoft Entra ID click on View button
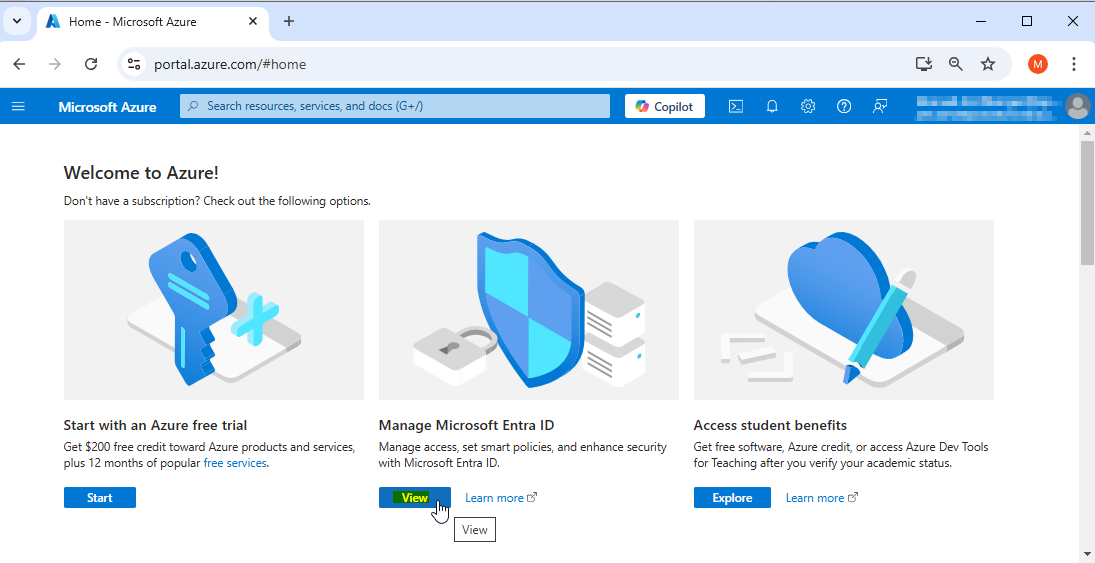
You are now on the welcome page of your Tenant:
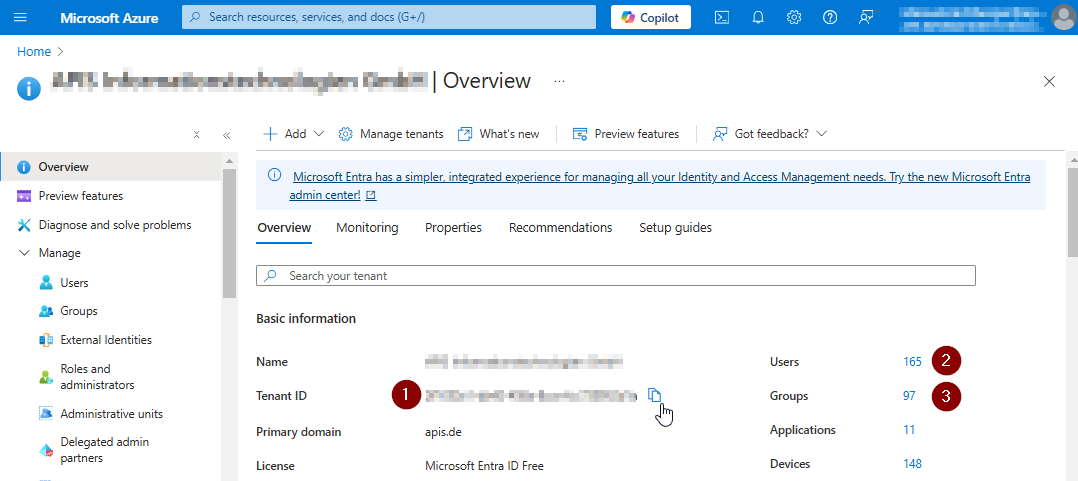
Tenant-ID: You can click on the copy Icon after the value to copy it. Needed for AZURE_TENANT_ID.
Click on the Number link on the right side of Users.
In the appearing User list click on the name of the user, which is going to do the initial system configuration, in the column Display name.
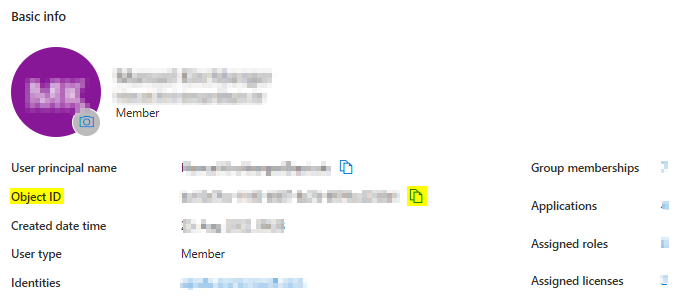 The Object ID value is needed in AZURE_ADMIN_UUID
On the same page you can click on the Number link on the right side of Group memberships.
In the appearing list of Groups click on the name of the group which you want to use as login group for all allowed users.
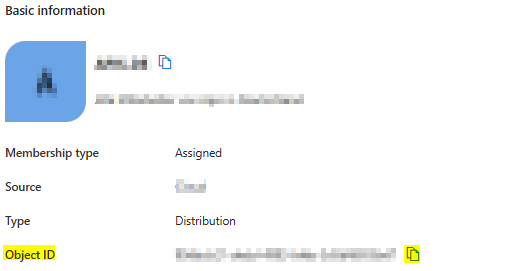
The Object ID value is needed as AZURE_LOGIN_GROUP_UUID. This configuration setting is not part of environment setup, but it’s needed on first start.
- The AZURE_SCOPE value should be set to the value User.read
Go back to Azure Portal Home
Click in the left area menu on App registrations and click on your app to see the details:
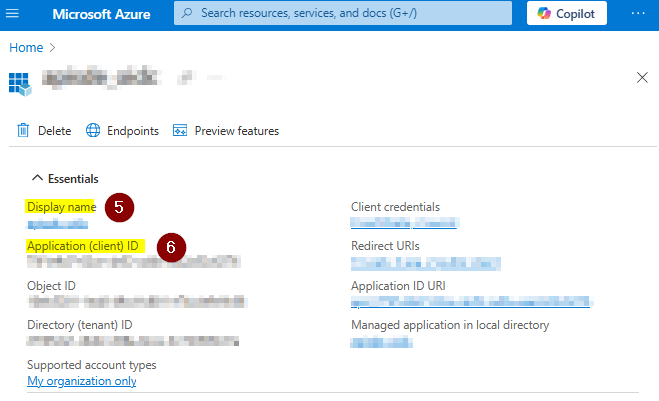
The Display Name value is needed as AZURE_CLIENT_NAME
The Application (client) ID is needed as AZURE_CLIENT_ID
The CLIENT_SECRET is configured in the App details below Client credentials on secret. Its value must be saved for later use when creating it, since it is only readable directly after adding it.
If you missed that and the value is unknown you have to recreate it as described in Azure - Configure Application and save the value as CLIENT_SECRET.
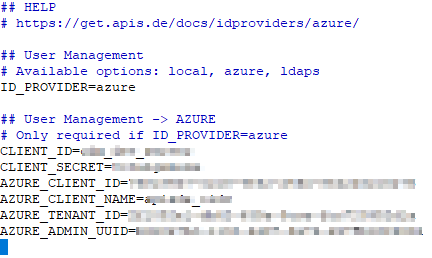
Go to the instance installation directory and open the .env.idp file with a text editor of your choice. In the file you have to write the parameter names and their assigned values in the schema ID_PROVIDER=azure
Example:
Test the Authentication Flow
Open the CDM-Server web interface and click on Dashboard to initialize the Authentication Flow.
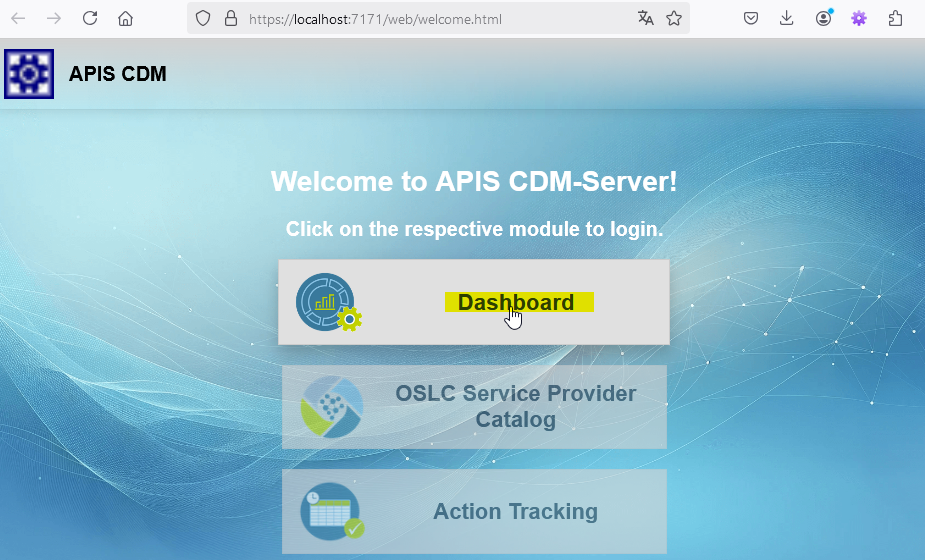
You should be redirected to Azure AD for login. Log in using the credentials of the configured admin user!
After a successful login, you’ll be redirected back to the third-party software.
Confirm that the authentication and authorization are working as expected.
Initial startup and configuration
Log in as admin user
Note
If your user is not the declared admin user in the environment setup, authentication will fail!Open the public CDM Server Welcome Page in browser and click on Dashboard to start Azure authentication.
Now add the ID of the group of the azure users which are allowed to log in to CDM Server in the form and click on validate.
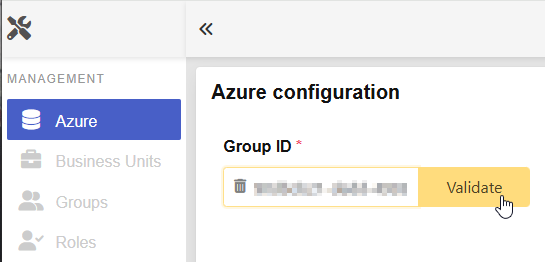
When validation succeeds the validate button changes to green

Then click on the button “Save” to store the initial configuration in the database.

To finally activate the change you have to click the “Finalize” Button. This means the configuration gets locked and is no longer editable. But you have to finalize when you are sure to enable all users in the configured group to log in to the CDM-Server.
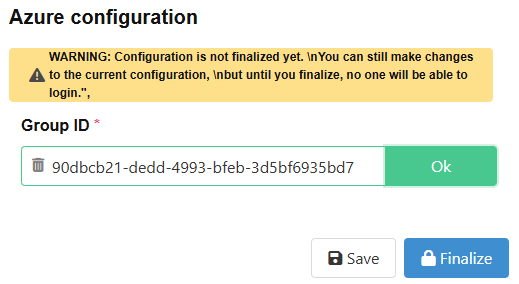
After clicking on finalize you have to confirm that you are sure and want to proceed. Confirm and select your account to log out your current azure session.
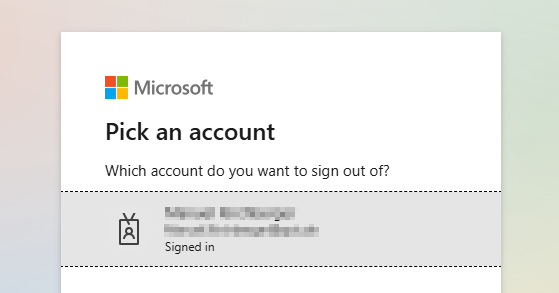
In case you logged out your current azure session you get redirected to the welcome screen and all users which are member of the login group can now log in to CDM-Server using Azure.
Possible Error Szenarios
The Login Group ID does not or no longer exist in Azure:
An error message will be displayed and saving the configuration is not possible.
Admin user is not member of the login group:
It is not possible to lock out the admin user, in this case an error message gets displayed.
Congratulations!
After succeeding all of these steps the Azure Users which are in the configured group can log in to the CDM Server!
Step 8: Maintain the Application
Periodically review and renew the client secret before expiration.
Adjust permissions or application settings in Azure AD if required by the third-party software or organizational policies.
Warning About Data Loss
Please note that, at this moment, we do not support changing the IdP without clearing all data. This means, if you set up a CDM-Server instance for testing
using Local or Ldaps for now, you will have to clear all data and start fresh when you want to switch to Azure.Here is a sample .env.idp file with the azure IdP configured:
## HELP
# https://get.apis.de/docs/idproviders/azure/

## User Management
# Available options: local, azure, ldaps
ID_PROVIDER=azure

## User Management -> AZURE
# Only required if ID_PROVIDER=azure

# The Microsoft Azure AD Directory (Tenant) ID
# The Tenant ID is an UUID and contains hexadecimal numbers (0-9a-f) seperated by - and
# can be found in Azure Portal on the Entra-ID welcome page.
#
# Example: "e53f2a45-f4d2-a11d-223a-77b654c12df5"
AZURE_TENANT_ID=

# The Azure Application (Client) ID
# The Application client ID is an UUID and belongs to the application which is configured
# for the authentication and authorization of azure users for CDM Server. The Id can be
# found in Azure Portal -> App registrations.
#
# Example: "53a12b45-1234-5566-8fe4-93b787a787d6"
AZURE_CLIENT_ID=

# The Azure Application (Client) Name
# The Application client Name is a Text and belongs to the application which is configured
# for the authentication and authorization of azure users for CDM Server. The Name can be
# found in Azure Portal -> App registrations.
#
# Example apis_cdm_authentication
AZURE_CLIENT_NAME=

# The Azure Admin UUID
# The Azure admin UUID must be the id of the Azure user who is going to configure CDM Server at first start.
# The user which belongs to the id is then an admin user and the only user which is able to log in to the
# CDM Server to complete the configuration.
#
# To get your Azure user id log in to https://portal.azure.com/ click on view entra and in the page feed
# in the middle area of the entra welcome page the user id is shown.
#
# Example fd163a2f-112a-7291-bdf4-a4325b78910a
AZURE_ADMIN_UUID=


 The Object ID value is needed in AZURE_ADMIN_UUID


