This is the multi-page printable view of this section. Click here to print.
Miscellaneous
1 - Changelogs
v1.4.0
Release Date: 2026-02-12
- Added support for IQ-Software V8.0 - 0070
- Improved the Candidates Matching view. “Approved candidates” are now displayed when requested.
- Fixed an issue preventing login when passwords contained certain Unicode characters.
- Enhanced confirmation dialogs for better clarity and usability.
- Improved the error message shown when submitting a check-in request for a deleted project.
- Updated web application dependencies to their latest versions.
- Added display of the closing reason when the server terminates a session.
- Added support for associating multiple tags with each project.
v1.3.0
Release Date: 2025-10-30
Feature
- RS-2316 Translation enhancement for the list of locked projects’ label.
- RS-2327 Project Checkout features.
- RS-2328 Preserve Business Unit & Projects management tree’s state on refresh.
- RS-2261 Prevent the loading of zxcvn library if it is not required.
- RS-2331 Reload Business unit’s data to ensure consistency when returning to Business Unit & Projects management.
- RS-2330 Show the reason in the “Session expired” notification when it is terminated by the Administrator.
- RS-2295 Translation enhancement for the available action in confirmation dialogs.
- RS-2343 Support of german translation on login page.
- RS-2403 Router enhancement to prevent application’s freeze.
- RS-2378 Display of permissions in the Business Unit & Projects management’s tree.
- RS-2180 Fixed multi language input dropdown’s size (too small).
- RS-1946 Display of the affected records in confirmation messages.
- RS-2384 Enhancement of the display of User in Candidates Matching view.
- RS-1932 Enhancement of the Action field’s background when containing an icon.
- RS-2356 Selection of BU & Projects’ dialog should preselect current node.
- RS-2315 Disable of edition of a locked project in Business Unit & Projects management.
- RS-2402 Added minimun lenght password validation in the “Change password” dialog.
- RS-2341 LDAP authentication supports Logins using E-Mail and also Windows and Unix usernames in various LDAP subtrees
Fixes
- RS-2261 Prevent the loading of zxcvn library if it is not required.
- RS-2330 Fixed “Session expired” notification’s title not translated to german.
- RS-2322 Fixed incorrect evaluation of session’s timeout when using Business Unit & Projects management.
- RS-2369 Fixed “Create from selected candidates” option missing.
- RS-2381 Fixed logout issues during candidates matching.
- RS-2374 Fixed routing issues after the change of password.
- RS-2396 Fixed access rights issue when same project is uploaded more than once but in a different Business Unit.
v1.2.1
Release Date: 2025-06-24
Fixes
- rs-2326 A container leaving zombie processes behind.
v1.2.0
Release Date: 2025-06-12
Feature
- IQ-Software – CDM-Server now supports IQ-Software V8.0 - 0050.
- rs-2164 Session View
- rs-1978 Make SESSION_INACTIVITY_TIMEOUT_IN_SECONDS configurable by the customer
- rs-1605 Client IP address added to access log
- rs-2128 Infobox component automatic size adjustment enhancement
- rs-2224 Improved check of certificate configuration at server start time
- rs-2267 Show proper error if root password is too short
- rs-2055 Added groups column to users view
- rs-2090 Enhance Drag-and-Drop with Auto-Expand for Business Unit Folders
v1.1.1
Release Date: 2025-03-26
Fixes
- rs-2200: Permission Error After Upgrading from v1.0.0 to v1.1.0
- rs-2204: Improved error logging
- rs-2213: IQ-Software connectivity error (TLS certificate related)
v1.1.0
Release Date: 2025-03-13
Features
- IQ-Software – CDM-Server now supports IQ-Software V8.0 - 0040.
- Login URL – The login URL has been updated to
/instead ofweb/welcome.html( Documentation ). - RBAC for CDM-Server – Roles can be defined on Business Units, Projects and Structures and the access to these elements is controlled by the Groups and Roles defined. ( Documentation ).
- Business Unit – A reload button has been added in Business Unit.
- Database Enhancements – Added automatic backup & manual restore functionality, and performance optimizations. ( Documentation )
- Settings Panel – Added a settings panel that allows the user to change the language. Admin can also set a contact email. ( Documentation )
- Bill of Materials – This has been updated. ( Documentation )
Fixes
- Better Login & Group Handling – Fixed login issues and improved group management in the initial setup.
- Azure & LDAP Integration – Bug fixes.
- Optimized Dashboard – Fixed missing or incorrect translations for a better user experience.
- Candidate Approval – Minor UI tweaks.
- Various improvements across the board for a smoother and more secure experience.
v1.0.1
Release Date: 2024-11-19
Features
- Support for IQ-Software V8.0
- Azure (Entra) integration
Fixes
- Minor bug fixes
v1.0.0
Release Date: 2024-11-06
Features
- Server support for IQ-Software V8.0
- Candidate approval workflow
- Local user management
- LDAP integration
- Role-based access control (RBAC) (No Enforcement)
- User and group management
2 - Data Backup/Restore and Maintenance
Backup
Automatic backup
The automatic backup system is integrated into the CDM-Server. It does not function when the CDM server is down.
Every night at 2:00 AM, a daily compressed backup file in the .tar.gz format is created in the .backups folder. This file, in turn, contains a highly compressed file named db.tar.gz, which holds all the database files required for restoring a database. Additionally, the backup file in the uploads folder contains binary blob files that belong to the CDM server’s data model but are stored outside the database for performance reasons. The name of the backup file is generated according to the following pattern:
cdm_backup_<database-version>_<date>.tar.gz
The date follows the format %Y%m%d%H%M%S and is based on the host system’s time zone. Here is an example of a backup file name created on December 12, 2024, starting at 2:00 AM, with the database version 16:
cdm_backup_16_20241212020000.tar.gz
Backup files older than 30 days are automatically deleted. The backup files are created without significantly affecting the database operations.
Preserving backup files for longer than 30 days is your task. Please make sure you copy the backup files to a save place before they get deleted.
Manual Backup Execution
Backups can also be manually initiated if needed (e.g., before deploying a new CDM server version). To do so, simply run the shell script:
sudo ./backup
The CDM-Server needs to be active for the backup to work. The backup is created without significantly affecting database operations. A manual backup must not be started while an automatic backup is running. The backup file is generated using the same pattern as the automatically created backup files and is located in the same folder. It is also named according to the same format and is also automatically deleted after 30 days.
Restore
To do this, run the script
sudo ./restore
Then, the instructions of the script must be followed. The script instructions are only available in English. The script stops the CDM-Server. If the script runs successfully, start the CDM-Server again using
sudo ./start
Maintenance
We automatically run some maintenance tasks on the data and database every week on Sunday at 00:00 and 04:00 (Server time).
Examples runs of sudo ./backup and sudo ./restore
Execute manual backup
sudo ./backup
pg_basebackup: initiating base backup, waiting for checkpoint to complete
pg_basebackup: checkpoint completed
pg_basebackup: write-ahead log start point: 0/E6000028 on timeline 1
pg_basebackup: starting background WAL receiver
pg_basebackup: created temporary replication slot "pg_basebackup_292042"
pg_basebackup: write-ahead log end point: 0/E6000100
pg_basebackup: waiting for background process to finish streaming ...
pg_basebackup: syncing data to disk ...
pg_basebackup: renaming backup_manifest.tmp to backup_manifest
pg_basebackup: base backup completed
Database and files backup completed.
Backup of database and files completed.
Execute restore
sudo ./restore
Page: 1 of 4

1. cdm_backup_16_20250221080438.tar.gz
2. cdm_backup_16_20250221075006.tar.gz
3. cdm_backup_16_20250221020000.tar.gz
4. cdm_backup_16_20250220020000.tar.gz
5. cdm_backup_16_20250219020000.tar.gz
6. cdm_backup_16_20250218020000.tar.gz
7. cdm_backup_16_20250217020000.tar.gz
8. cdm_backup_16_20250216020000.tar.gz
9. cdm_backup_16_20250215020000.tar.gz
10. cdm_backup_16_20250214020000.tar.gz

Enter the number to select a backup, 'n' for next page, 'q' to quit.
Choose an option: 1
Selected backup: cdm_backup_16_20250221080438.tar.gz
Are you sure you want to restore this backup? (y/n): y
Validating the backup file...
Backup file validated successfully.
Stopping the app and database container...
Stopping the server with Docker Compose...
[+] Running 7/7
✔ Container main-proxy-1   Removed                                                                                                                                                          0.9s
✔ Container pfx-converter  Removed                                                                                                                                                          0.0s
✔ Container cdm-web-1     Removed                                                                                                                                                          0.2s
✔ Container cdm-app-1     Removed                                                                                                                                                          2.3s
✔ Container main-db-1      Removed                                                                                                                                                          0.4s
✔ Network main_default     Removed                                                                                                                                                          0.2s
✔ Network main_common-net  Removed                                                                                                                                                          0.3s
Server stopped successfully!
Server stopped successfully!
Restoring the backup...
Database and file restoration process completed.

sudo ./start
3 - Service Worker
Supported Features
Session Management
- Auto Logout: The service worker keeps track of open tabs and logs you out automatically when no clients are active.
- Session Check: It periodically checks if your session is still active. If the session has expired or is no longer valid, all open tabs will be notified.
- Session Update Notifications: When your session changes (e.g., you log out, or your session expires), all open tabs are updated with the new session information.
Client Communication and Coordination
- Active Tab Updates: The service worker keeps track of which tabs are open and ensures all of them are updated when a new tab opens or an existing one is closed.
- Language & Project Updates: Relays language changes and locked project updates among all active tabs, so they stay in sync.
Impact When the Service Worker Is Not Working
If the service worker fails or is unavailable, the following issues may arise:
- Session Problems: Without the service worker, automatic logout and periodic session validation may not occur. This could lead to stale sessions or unexpected logouts.
- Delayed or Missing Notifications: Real-time notifications regarding session updates, language changes, or locked projects may not be delivered, causing inconsistencies across tabs.
- Tabs Out of Sync: If you have multiple tabs open, they may not stay coordinated. Changes in one tab (e.g., language updates) might not be reflected in other tabs, leading to inconsistencies and potential user confusion.
Troubleshooting
If you’re experiencing issues with the service worker, here’s what you can do to resolve it:
Check Browser Support
Ensure that your browser supports service workers. Most modern browsers support them, including:- Chrome
- Firefox (note that it might not work in private browsing mode)
- Safari
- Edge
Some browsers may block service workers in certain modes, so be sure to check your browser’s settings.
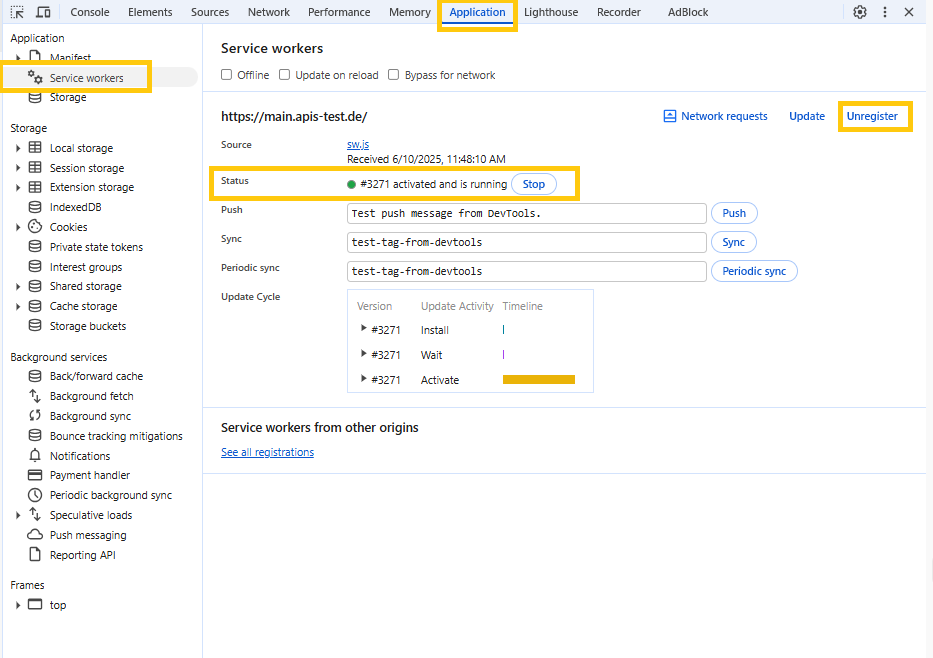
For a detailed list of supported browsers and any known compatibility issues, please refer to the official Service Worker Browser Compatibility page on MDN Web Docs.Verify the Service Worker is Active
Use the browser’s developer tools to check if the service worker is registered and active. Here’s how:- In Chrome, Edge and Firefox:
- Open Developer Tools (
F12). - Go to the “Application” tab.
- Under “Service Workers”, verify if the service worker is registered and listed as “Activated”.
- Open Developer Tools (
- In Chrome, Edge and Firefox:
Re-register the Service Worker
If the service worker is not active or seems outdated, try re-registering it:- In Chrome, Edge and Firefox:
- Open Developer Tools (
F12). - Go to the “Application” tab.
- Under “Service Workers”, click “Unregister” if it’s listed there.
- After unregistering, refresh the page to force the registration of the latest service worker.
- Open Developer Tools (
- In Chrome, Edge and Firefox:
Look for Fallback Notifications
The application may display a warning if the service worker is unavailable. Pay attention to any messages or prompts in the app that provide more details or steps to take.
4 - Logs
Logs Rotation
We have implemented log rotation for the server logs and docker logs. If you find a log file that is not being rotated, please submit a bug report.Application Logs
In the .logs directory, you can find all the logs generated by the server.
Container Logs
There are also some logs generated by OCI containers. You can find them in the /var/lib/docker/containers (or equivalent if you are using something else) directory.
For database, 10x 10mb files are retained. For application, 10x 100mb files are retained.
5 - Setup on Windows
Unsupported
At this moment, we do not support running CDM-Server on Windows. This guide is for informational purposes only.Prerequisites
- Latest Windows Version with WSL2 Support
- Recommended: Windows Server 2022
- Should Work: Windows 11 23H2+
- Access to Windows Store
- Internet Connection
Installation Steps
- Install: Ubuntu LTS on Windows Store
- Alternatively, open
Windows Store, Search forUbuntu(by Canonical Group Limited) and Install it
- Alternatively, open
- Open
Ubuntufrom START and follow the instructions to set up your user inside WSL Ubuntu - Install Docker Engine with Docker Compose Plugin
- (Recommended) Uninstall Old Versions
- From the official Docker website: Install Docker Engine
- This involves two steps: add canonical apt repository and then installing docker engine
- Once done, optionally type:
cd ~ && mkdir cdm && cd cdm - Now that you have a working linux inside windows, you can follow the CDM-Server installation on linux steps: See here
- After the installation, you can find the CDM-Server in
~/cdmdirectory
Troubleshooting
- I can access CDM-Server from the server computer but not from other devices
- Check your firewall settings and make sure the port is open
- The specified
CDM_HOSTshould resolve to the server’s IP address
- I want to run CDM-Server as a service in Ubuntu
- You need to follow WSL2 Systemd Guide to run services in WSL2
6 - Bill of Materials
Software Bill of Materials
Software Bill of Materials (SBOM) is a complete list of all the software components used in a project. It is a critical part of the software supply chain and helps in identifying and mitigating security vulnerabilities.CDM-Server SBOM
We provide the SBOM in OWASP’s CycloneDX v1.5/v1.6 format which has been officially ratified as an Ecma International standard.
You can find the SBOM for CDM-Server here:
v1.4.0: JSON 1 | Summary 1 || JSON 2 | Summary 2v1.3.0: JSON 1 | Summary 1 || JSON 2 | Summary 2v1.2.1: JSON 1 | Summary 1 || JSON 2 | Summary 2v1.2.0: JSON 1 | Summary 1 || JSON 2 | Summary 2v1.1.1: JSON 1 | Summary 1 || JSON 2 | Summary 2v1.1.0: JSON 1 | Summary 1 || JSON 2 | Summary 2v1.0.1: JSON | Summaryv1.0.0: JSON | Summary
Additional Information
CDM-Server also utilizes:
- Java 21 (Temurin JRE 21.0.5)
- PostgreSQL v17 (postgres:17-alpine)
- pgautoupgrade/pgautoupgrade:17-alpine
- Alpine Linux
- pg_repack 1.5.0
- Bulma 0.9.4
- Caddy 2.9.1
- Traefik 3.3.3
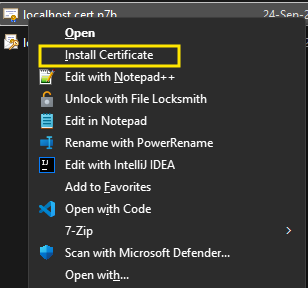
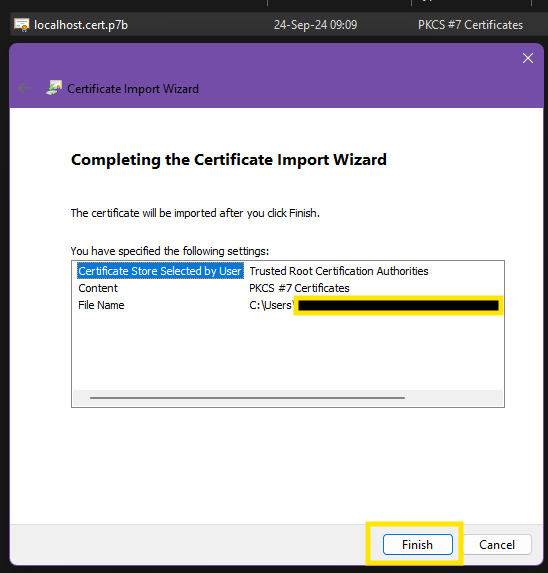
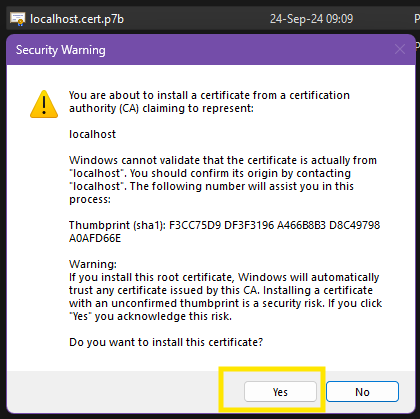
7 - Install Self-Signed Certificate
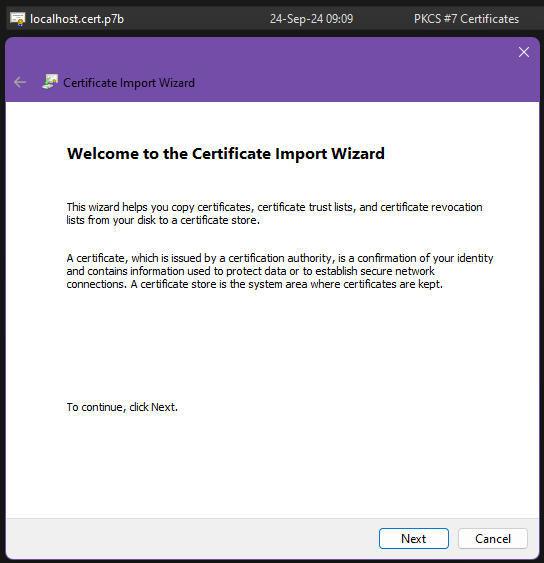
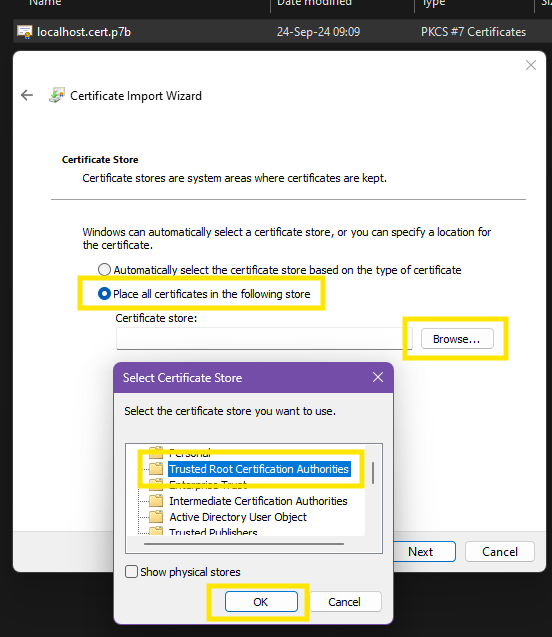
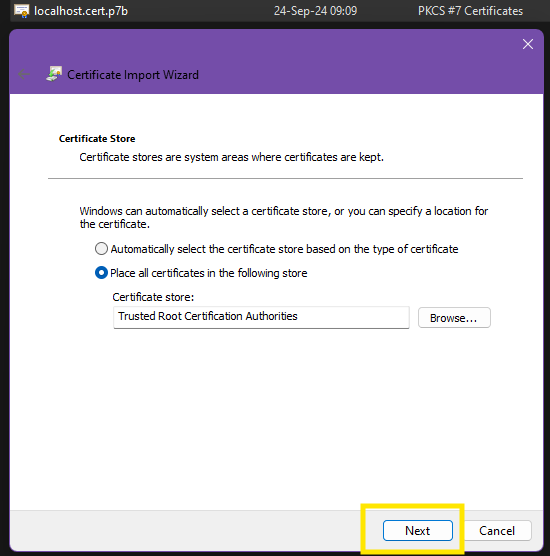
Manual Installation Steps
First, you receive the certificate from the administrator. Then, you can install it using the following steps:
Certificate Location
For Admins: The system generated self-signed certificate location is given here.Consult with Your Administrator
Please consult with your administrator before installing the certificate.